5 Lightroom Keyboard Shortcuts Everyone Should Know

The post 5 Lightroom Keyboard Shortcuts Everyone Should Know appeared first on Digital Photography School. It was authored by Andrew S. Gibson.

Essential Lightroom keyboard shortcuts

Lightroom is a fantastic program that’s designed for fast and efficient editing, but if you make all your adjustments using your mouse, you may notice that each little operation starts to add up – until you’ve spent hours upon hours moving your cursor, clicking the mouse, and more.

Fortunately, Adobe built in plenty of handy Lightroom keyboard shortcuts, all of which aim to make life easier for photographers and photo editors. Below, I share a few of the most critical shortcuts, which will allow you to speed up your workflow, improve your editing efficiency, and even access hidden features.

Ready to become a Lightroom shortcut expert? Then let’s dive right in, starting with:

1. Reveal all shortcuts

Lightroom offers dozens of shortcuts, many of which are difficult to remember – especially if you don’t use them often.

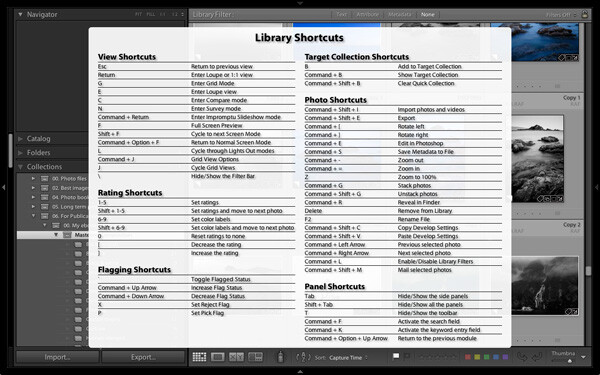
Fortunately, you can always tap Ctrl/Cmd+/, and a list will pop up that displays all of the shortcuts available in the current module. Therefore, if you’re working in the Library module, this shortcut will reveal the Library module shortcuts:

Lightroom keyboard shortcuts

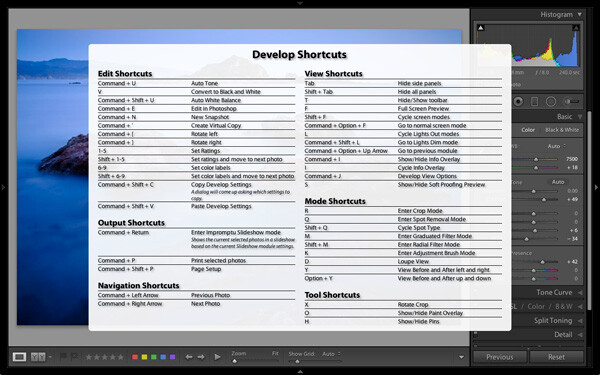
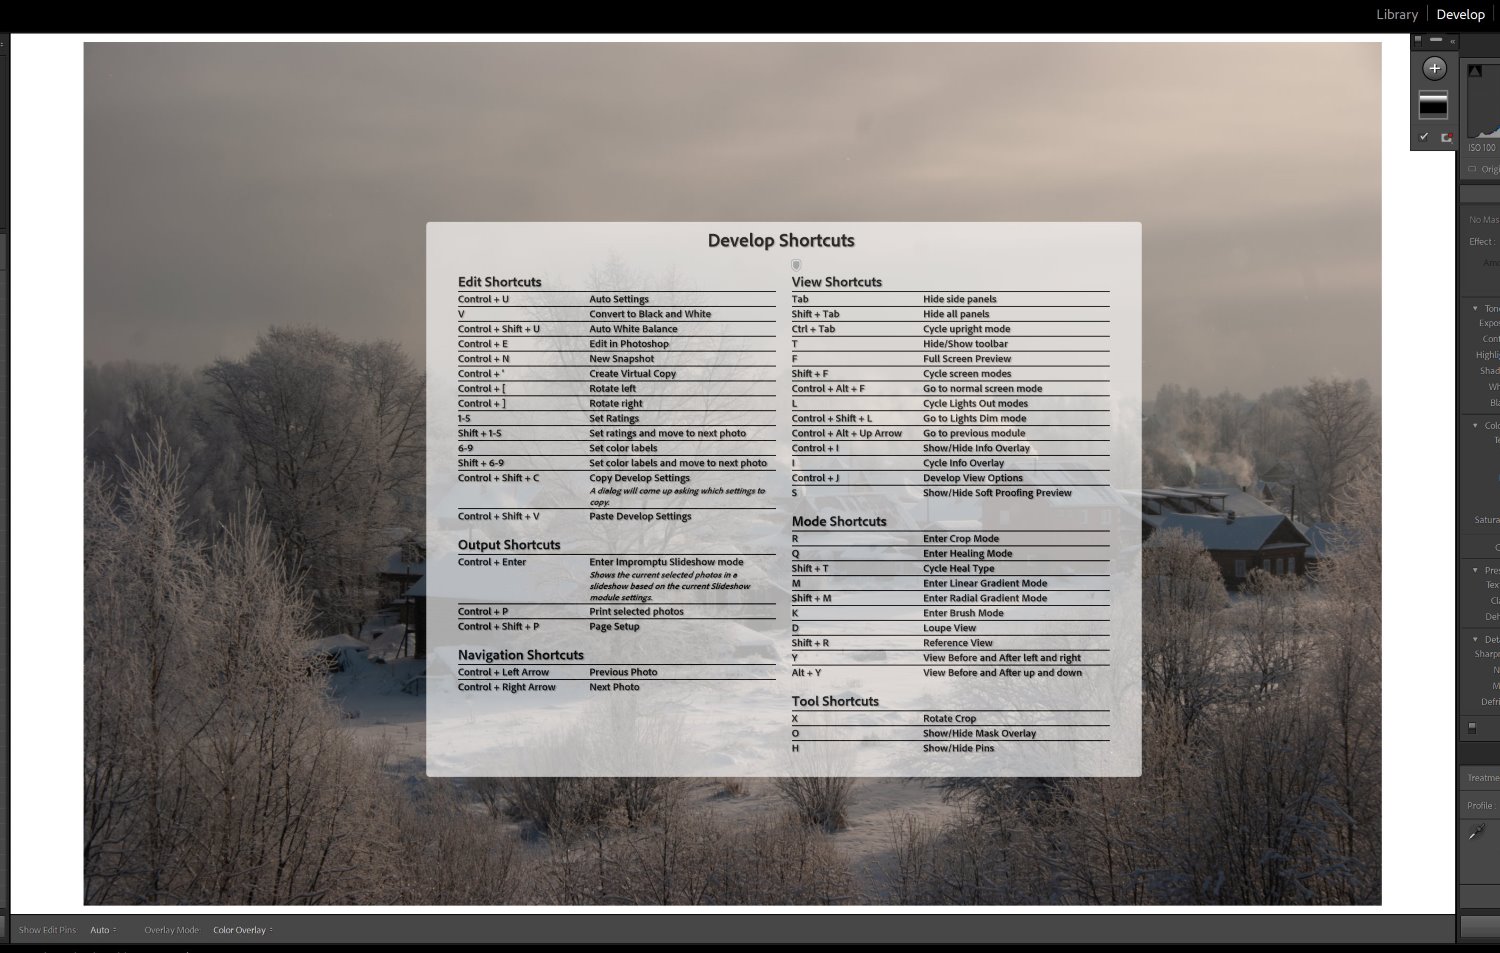
And if you’re working in the Develop module, this shortcut will reveal the Develop module shortcuts:

Lightroom keyboard shortcuts

(Once you’re done with this article, I highly recommend you head into Lightroom and read through the shortcuts available for both the Library and Develop modules. You’re practically guaranteed to learn something new!)

When you’ve finished checking out your shortcut options, click anywhere on the list to hide it.

2. Tap “R” to access the crop function

This shortcut is a simple one, but it’s a big timesaver. Whenever you need to crop an image, simply head into the Develop module, then hit the R key. The crop overlay will immediately appear:

Lightroom keyboard shortcuts

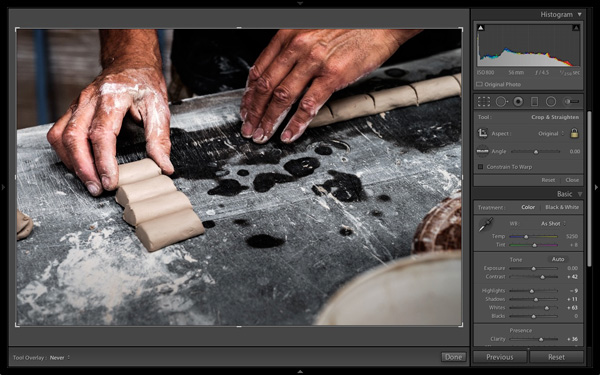
And you can get to work cropping your file!

Additionally, if you don’t like the direction of the crop overlay, just tap X, then watch as it’s rotated:

Lightroom keyboard shortcuts

This can be especially useful if you’re trying to crop a portrait image with a landscape aspect ratio and vice versa because Lightroom automatically creates crop overlays that match the orientation of the image file.

3. Use the “/” key to resample the image

Lightroom has several healing modes, all of which can be accessed with the Q key. Each of these modes approaches the healing process – which replaces content from the image by sampling content from elsewhere in the image – differently.

The wonderful thing about the Lightroom Healing tool is that it’s quite good at guessing which part of the image it should sample to create a natural-looking result. It’s a great way to correct dust spots, unwanted facial blemishes, and distracting dirt or rocks on the ground around your subject.

However, despite the Healing tool’s impressive capabilities, it doesn’t do a perfect sampling job all the time. That’s where this shortcut comes in handy!

Start by selecting one of the healing modes and clicking on your image. If you don’t like the sampling choice, just press the / key, and Lightroom will choose a different area of the image to sample. You can repeat this as often as you like until you get a satisfactory result!

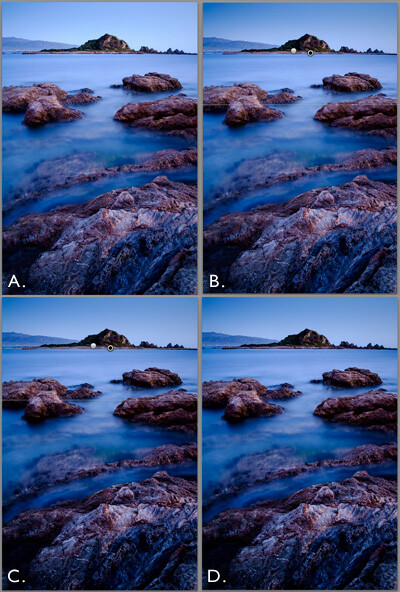
For this next (zoomed-in) image, I wanted to get rid of this distracting dark blob in the background:

Lightroom keyboard shortcuts

However, Lightroom’s first guess didn’t really work:

Lightroom keyboard shortcuts

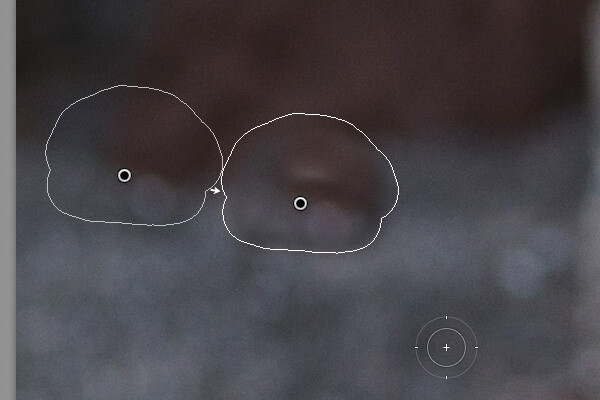
I hit the shortcut key, Lightroom resampled the image, and the result was much better:

Lightroom keyboard shortcuts

Pro tip: If you keep resampling the image and you can’t do any successful healing, you can always sample the file manually by using your cursor (though this does take longer than using the shortcut).

4. Use the “Shift” key to set the white and black points

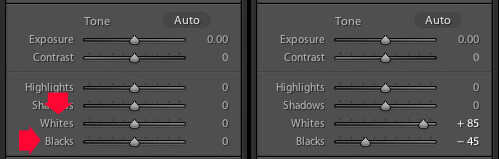
RAW files often appear a bit flat, and an easy way to add some pop is by carefully setting a white and a black point – that is, by adjusting the Whites slider until the brightest tones stretch to the right side of the histogram, and by adjusting the Blacks slider until the darkest tones stretch to the left side of the histogram.

The process of setting the white and black point can be arduous – unless you know a handy little shortcut!

Normally, if you double-click on the Whites and Blacks sliders in the Basic panel, Lightroom resets them to zero. But if you hold Shift while double-click on these sliders, Lightroom calculates where to position both sliders so that the histogram stretches all the way from the left side of the graph (shadows) to the right (highlights):

Lightroom keyboard shortcuts

This quick fix makes most photos look better right away!

5. Use the apostrophe key to invert a Linear Gradient

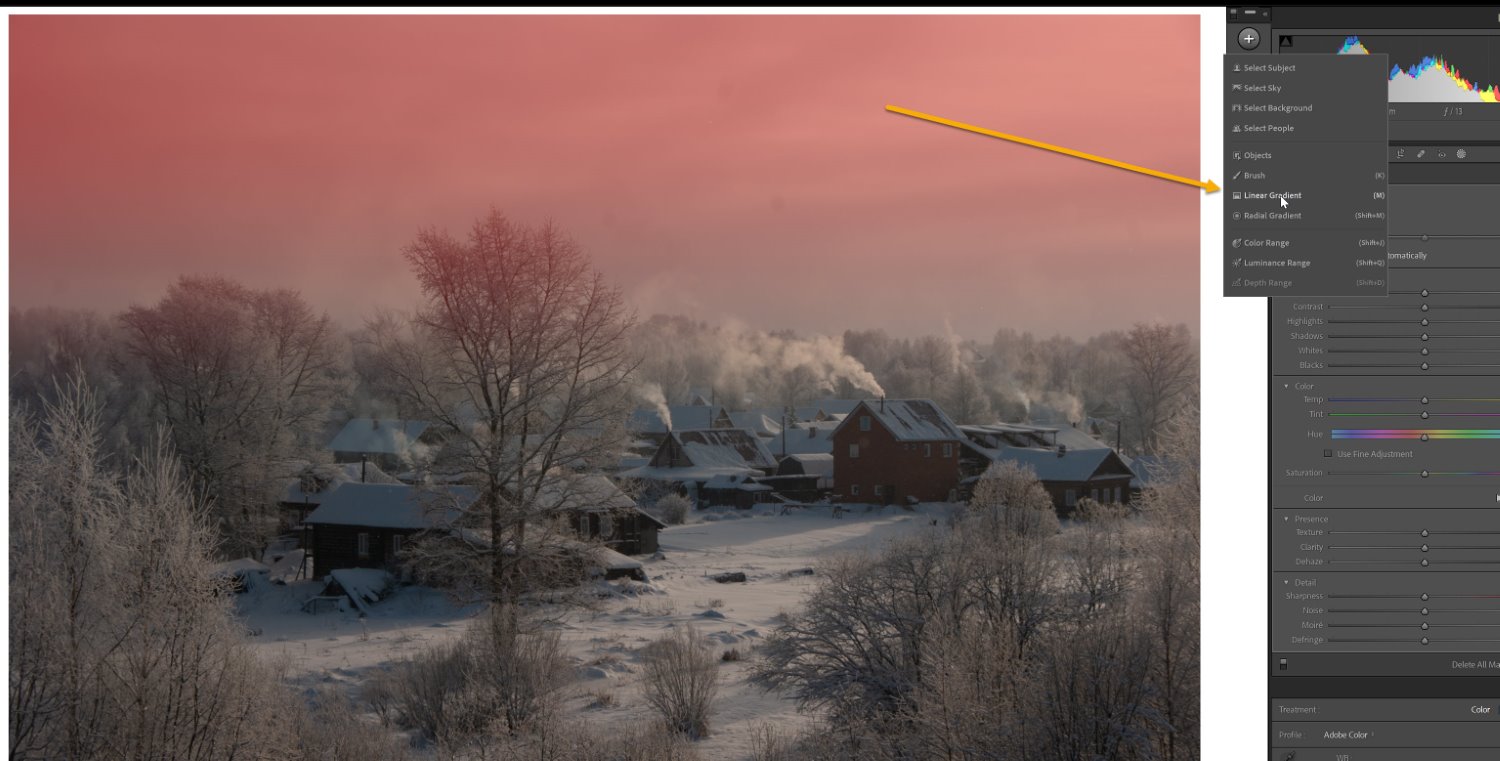
Lightroom offers an array of local adjustment tools, including the Brush, the Radial Gradient (formerly known as the Radial filter), and the Linear Gradient (formerly known as the Graduated filter).

The Linear Gradient allows you to apply natural-looking adjustments to a portion of the image, such as the sky or the foreground of a landscape, without modifying the rest of the scene. Normally, you would create a Linear Gradient (you can tap Shift+W to open the Masking panel), then drag it over the foreground or sky of your shot as you see fit.

Lightroom keyboard shortcuts

But what if you want to reverse the direction of the effect? Just press the apostrophe key – – and the Linear Gradient will flip!

Here’s a great way to use this shortcut:

  1. Create a Linear Gradient over the sky of a landscape. Drop the Exposure slider to darken that area.
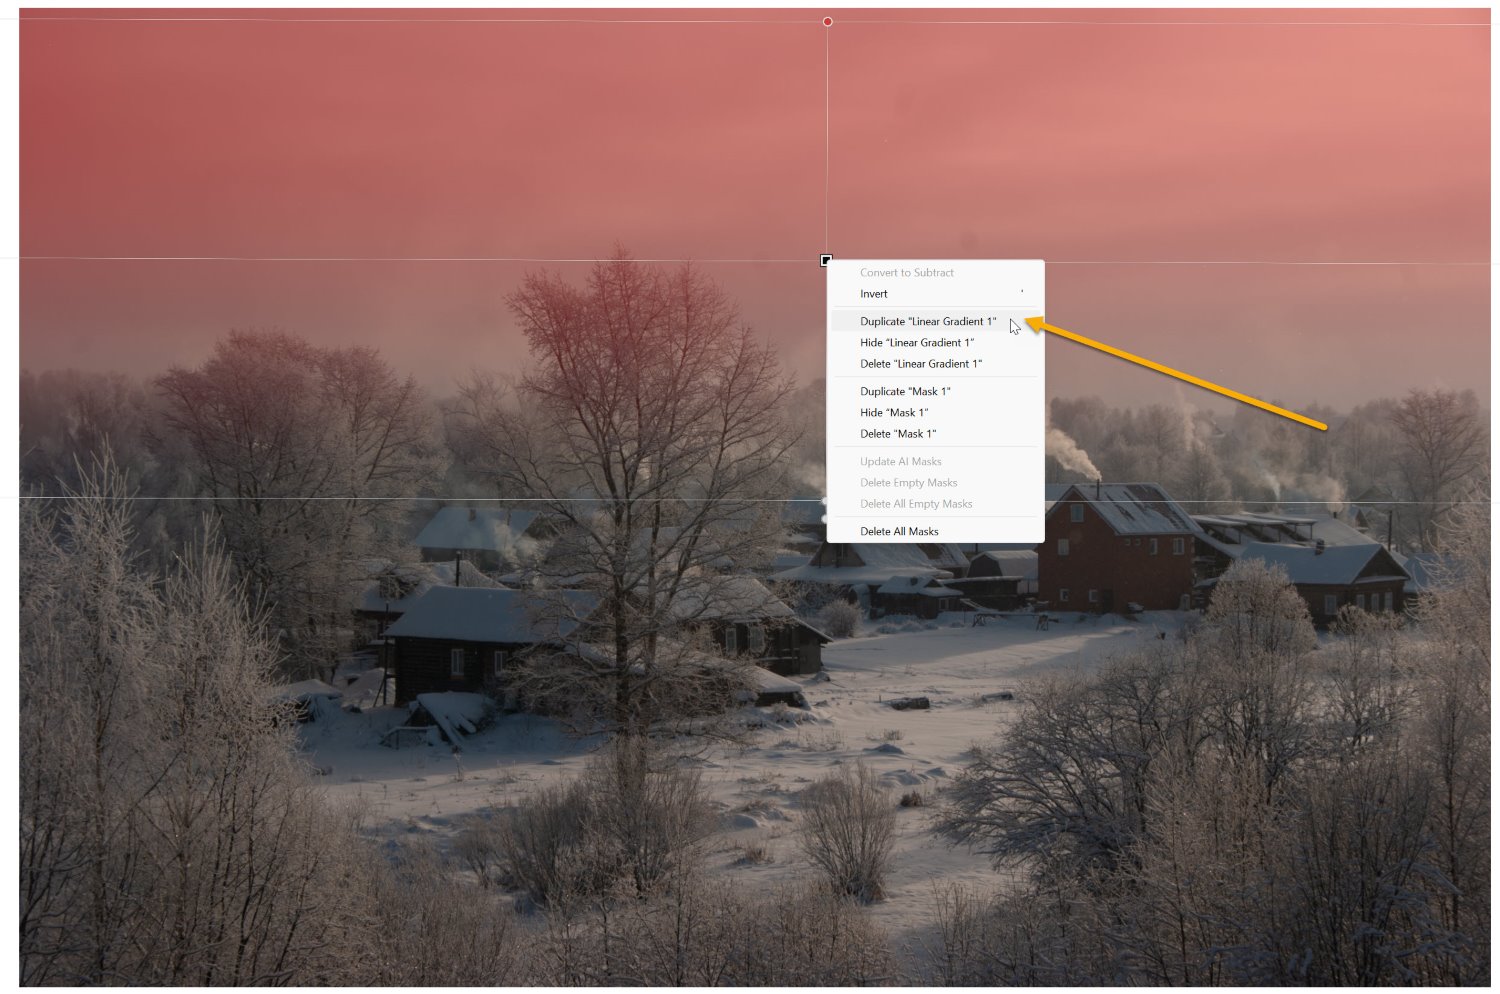
  2. Right-click on the Gradient’s pin. Select Duplicate to create a new Linear Gradient with the same settings as the first.
  3. Press the apostrophe key to flip the Gradient. The negative Exposure setting will be applied to the foreground, but you probably don’t want to make the foreground darker; instead, double-click the Exposure slider to return it to zero.
  4. Now you’re ready to use this new Linear Gradient to enhance the foreground. Boost the Clarity slider to emphasize foreground texture. You might also subtly darken the foreground by dropping the Exposure slider (which will help retain a sense of drama and depth).
Lightroom keyboard shortcuts

Once you’ve made all the above adjustments, you’ll have a beautiful file modified by two Linear Gradients!

Lightroom keyboard shortcuts
(A) Original photo. (B) Linear Gradient with negative Exposure applied to the sky. (C) Duplicated and flipped Linear Gradient applied to foreground, with extra Clarity but subtly negative Exposure. (D) Final result.

Lightroom keyboard shortcuts: final words

Now that you’ve finished this article, you’re ready to head into Lightroom, create some stunning edits, and speed up your workflow with these handy shortcuts.

So what are you waiting for? Get post-processing!

Lightroom keyboard shortcuts

Now over to you:

Which of these keyboard shortcuts do you plan to use? Do you have any favorite shortcuts we missed? Share your thoughts in the comments below!

The post 5 Lightroom Keyboard Shortcuts Everyone Should Know appeared first on Digital Photography School. It was authored by Andrew S. Gibson.

How to Create a Twirl Effect in Photoshop: A Quick Guide

The post How to Create a Twirl Effect in Photoshop: A Quick Guide appeared first on Digital Photography School. It was authored by Ana Mireles.

How to create a twirl effect in Photoshop

The Photoshop twirl effect is a cool editing trick that can turn bland images into abstract art. Even if you haven’t heard of it by name, I’m sure you’ve seen it around – it’s very popular among Photoshop lovers.

But how does it work, and how can you apply it to your own photos? In this article, I explain how to create a twirl effect in Photoshop, and I also offer several tips and tricks to ensure you get the best possible results!

Let’s dive right in.

What is the twirl effect?

The twirl effect is a post-production technique that stretches and “twirls” an image, like this:

How to create a twirl effect in Photoshop

In this article, I focus on creating the twirl effect in Photoshop, but note that it’s not a PS-exclusive technique; you can apply it using a variety of comprehensive editing programs.

During the process, your image loses all detail and figurative references. First, you turn your photograph into an abstract scene formed by colored lines, which you then warp to create a twirl effect.

When is a twirl effect useful?

How to create a twirl effect in Photoshop

The twirl effect is a great way to achieve dreamy, abstract art, no matter the underlying image. I’d recommend using it whenever you’re looking to create some digital artwork; while the result won’t look natural, it’s often quite spectacular!

One of the good things about this technique is that you can apply it to pretty much any photo. You might have a few images lying around that, on their own, are nothing special. Perhaps they aren’t technically correct – for example, they’re blurry. However, by applying the twirl effect, you can create something beautiful.

How to create a twirl effect in Photoshop: step by step

It’s very easy to create the twirl effect, even if you have zero editing experience! Simply follow these steps and experiment with each filter until you get a solid result.

Step 1: Select and open your photo

Start by opening a photo in Photoshop. It doesn’t matter which image you use – the twirl effect can be applied to any subject or composition. And if you’re struggling to decide between a few different shots, why not try them all?

Step 2: Prepare a second layer

How to create a twirl effect in Photoshop

Next, you’ll want to duplicate the background layer (i.e., your photo). Drag it to the plus sign at the bottom of the Layers panel or simply choose Layer>Duplicate Layer in the menu.

Then convert the new layer to a Smart Object. You can right-click the layer and choose Convert to Smart Object, or you can choose Filter>Convert for Smart Filters.

That way, you can go back to each filter later on and make adjustments again without having to start over.

Step 3: Add a Mezzotint filter

How to create a twirl effect in Photoshop

To create the twirl effect in Photoshop, you need to apply a series of filters to your image. The first one is Mezzotint.

In the main menu, choose Filters>Pixelate>Mezzotint. This will open a dialog box. Beneath the preview window, you can open the Type menu and pick your preferred type.

At this point, choosing between the different types won’t make much sense unless you’ve done the twirl effect before. So don’t worry too much about it. You can also come back and change it once you’ve applied the next filters because you converted the layer into a Smart Object.

In this case, I’m using the Medium Strokes type, but don’t feel that you have to do the same.

Step 4: Apply the Radial Blur filter

The next filter you need to apply is a Radial Blur, so head into the menu and select Filters>Blur>Radial Blur.

In the dialog box, set the Blur Method to Zoom. As for the Quality: You can choose Draft to speed things up, or you can use Good or Best if the file isn’t too big. At this point, you still have to apply more filters, so it’s not a problem to keep the value as Draft.

How to create a twirl effect in Photoshop

I’d suggest setting the amount to 100. You can always come back later and experiment with different numbers to see how they influence the final effect.

Then add the Radial Blur filter again. When you open the Filters menu, you’ll find the last filter you used at the top, so go ahead and select it:

How to create a twirl effect in Photoshop

The Radial Blur dialog box will open once more, and it should feature the same settings as before. Simply click OK.

Finally, apply the filter a third time, but make sure you change the Quality to Best:

How to create a twirl effect in Photoshop

Step 5: Add the Twirl filter

At this point, your photo should be looking pretty abstract, which means it’s time to start the twirling process! In the main menu, select Filter>Distort>Twirl.

How to create a twirl effect in Photoshop

In the dialog box, boost the Angle slider to add the twirl effect. There isn’t a magic Angle value that works for every image. Simply move the slider until you like what you see in the preview window, then click OK.

Go ahead and duplicate your twirled layer using the same process discussed in Step 2.

Step 6: Modify the duplicated layer

Identify your duplicate layer in the Layers panel. Note that the duplicate layer will contain all the Smart Filters you’ve applied so far. So double-click on the Twirl filter to open its dialog box:

How to create a twirl effect in Photoshop

Drag the Angle slider to the left until you reach the negative of the number you previously chose. I used an initial value of 197, so I’ll use an Angle value of -197.

(Pro tip: To quickly reverse the value, just click inside the value box and type a hyphen before the number.)

Now the twirl should go in the direction opposite that of the first layer. Click OK to apply it.

Step 7: Adjust the layer blend mode

At this point, you should have two layers, each featuring opposite twirls. However, the top layer will be completely blocking the layer underneath, and we need both layers to interact.

Simply open the Blend mode menu on the Layers panel, then pick a mode! Feel free to experiment with different modes to create different effects (and if you’re using Photoshop CC, you can preview the result as you hover over different blending options).

How to create a twirl effect in Photoshop

And that’s it; your twirl effect in Photoshop is done!

Tips and tricks to improve your twirl effect images

Once you can create a nice twirl effect, try a few of these tips to improve your workflow and level up your results:

1. Create an action

How to create a twirl effect in Photoshop

Making the twirl effect in Photoshop is very easy. However, it does involve a handful of steps. If you want to streamline your workflow and quickly apply the effect to any photo, you can create an Action.

Start by opening the image you want to modify. Then open the Actions panel. At the bottom, you’ll find a Plus symbol; that’s the New Action button.

Choose a name and start recording. Then follow the steps shared above to create the twirl effect. Once you’ve finished, stop the recording.

The next time you want to apply the twirl effect to an image, simply play the Action and Photoshop will automatically follow all the steps.

2. Apply the mirror effect

The twirl effect is nice, but if you want to get even more creative, you can apply the mirror effect to your image. To do this, you flip the image and put it next to the original.

How to create a twirl effect in Photoshop

You can even create a variety of different copies of the image, each rotated and cropped, and blend them together. There’s no limit to your creativity!

3. Use a mask to reveal part of the original image

How to create a twirl effect in Photoshop

Another creative application of the twirl effect? Combine the twirled file with part of the original image. You’ll need to use a layer mask to cover and reveal the different parts. Here’s how:

Create a new Group with the two layers that have the twirl effect. You can do this by selecting the layers and clicking on the folder icon at the bottom of the Layers panel.

Make sure the Group is selected, then click on the Layer Mask button. You’ll see a blank thumbnail appear next to the folder. Here, anything that you paint in black will be covered up, revealing anything that lies below (on the original background layer).

So use the Brush tool to paint black over the layer mask and reveal the unmodified shot underneath. And if you mess up while painting, don’t worry; you can always switch to a white Brush and paint over the mistake.

How to create the twirl effect: final words

I hope you liked this twirl effect tutorial! It’s a great way to produce plenty of interesting abstract effects – and you can apply them to pretty much any image, no matter their original quality.

So spend some time adding the twirl effect to your photos. Maybe even create an action. Good luck!

Now over to you:

Do you have any twirl effect photos that you’re proud of? Do you have any tips or tricks for better results? Share your thoughts in the comments below!

The post How to Create a Twirl Effect in Photoshop: A Quick Guide appeared first on Digital Photography School. It was authored by Ana Mireles.

How to Use a Graphics Tablet to Edit Photos: 10 Powerful Tips

The post How to Use a Graphics Tablet to Edit Photos: 10 Powerful Tips appeared first on Digital Photography School. It was authored by John McIntire.

using-a-graphics-tablet-for-photo-editing

Photo editing is simpler than ever thanks to the power of a graphics tablet! Explore our top 10 tips to level up your skills.

If you’re just getting started with post-processing and retouching, you’re probably using a mouse and keyboard combo. You can get by with this setup, sure. But when the tasks become more intricate, the precision required can make the process pretty tedious.

That’s where a graphics tablet, like those from Wacom, comes into play. With a tablet, you can gain a whole new level of control and precision. You might even find that your editing workflow gets a significant speed boost.

Using a graphics tablet for photo editing can be pretty intuitive. Unfortunately, you might stumble a bit when it comes to the subtler aspects – but don’t fret, because this article will arm you with handy tips to help you unlock your tablet’s full potential.

Let’s dive right in!

1. Set up your tablet carefully

Using a graphics tablet for retouching photos.

Your first order of business? Setting up your graphics tablet the right way.

While many devices come with a plug-and-play feature and seem to work as soon as you plug them in, for graphics tablets, that’s not the whole story.

Truth be told, you might be able to use the pen, but the full functionality of your tablet isn’t unlocked until you install and configure the necessary software. Make sure to install all relevant drivers for your tablet, and if it comes with a software suite, explore all the options to optimize it to your liking.

Your tablet might seem fully functional without any software, but trust me: If you don’t want to miss out on any features, installing the provided software is crucial.

Over time, your preferences may evolve. If you feel that something could be improved, dive back into the software settings. There might be a solution to your issue just a few clicks away.

How to Use a Graphics Tablet to Edit Photos: 10 Powerful Tips
A lot of tablets will seem to work without any software installed, but such users are missing out on a lot of features.

2. Program those shortcut buttons

Once the basic setup is done, it’s time to turn your attention to the shortcut buttons.

The number of programmable buttons on your graphics tablet can vary based on the model. The budget-friendly ones might have only a few, while the pricier ones could be dotted with buttons.

How to customize these buttons is completely up to you. A smart approach is to reflect on your usual photo-editing workflow. What actions do you perform the most? Which of these could be executed more conveniently with a simple button click?

Once you’ve figured that out, setting up the buttons to suit your preferences is a breeze.

How to Use a Graphics Tablet to Edit Photos: 10 Powerful Tips
You have full control over how your shortcut buttons are set up. Use these in any way that suits your work!

Remember, you have complete control over your shortcut button configurations. Make them work for you, not the other way around.

I’ll be honest, I don’t find myself using the shortcut buttons all that much. The only one I find handy is for rotating the canvas. You might feel the same, and that’s perfectly okay. Don’t feel pressured to use something that doesn’t mesh with your style or needs.

3. Learn keyboard shortcuts

Keyboard shortcuts while using a graphics tablet make a powerful combo.
Even with a tablet, you can still use the keyboard a lot when you work in Photoshop. Be sure to memorize any keyboard shortcuts that are relevant to you.

Even when you have a graphics tablet at your disposal, the keyboard remains a crucial partner in crime, especially when you want to speed up your workflow with quick keyboard shortcuts. Make it a point to read through each and every shortcut offered by your favorite editing program, write down the most useful ones, and ideally commit them to memory.

You might be wondering: If you have a graphics tablet for photo editing that features a handful of programmable buttons, why are keyboard shortcuts necessary at all?

Whether you work in the world of Lightroom, Photoshop, or other editing software, there’s such a rich array of features that it’s impossible to map all their functionality onto a few buttons. This is why it’s worth your while to program a few buttons, then spend time learning as many keyboard shortcuts as you can – particularly the ones that align with your usual editing workflow.

Admittedly, using a stylus in one hand and tapping keyboard shortcuts with the other might seem a little odd to begin with. But go ahead and persevere; you’ll soon find that it’s not as daunting as it first appears.

4. Understand the magic of “undo”

Among all the keyboard shortcuts at your disposal, there’s one you likely lean on more than any other. That’s the “undo” function, which reverses your last action and can be accessed by hitting Ctrl+z (or Cmd+z)

A pen enables you to make precise strokes, but just like sketching, not every stroke will turn out exactly as you want on the first go. There’s absolutely no harm in hitting “undo” repeatedly until you achieve the result you’re after. So get familiar with the Ctrl+z (or Cmd+z) and Ctrl+Alt+z (or Cmd+Alt+z) shortcuts.

If it makes your life easier, you could even set up this function as a shortcut button on your tablet.

5. Customize your brush settings

When you bring a graphics tablet into your photo editing journey, you also unlock some nifty features in Photoshop that were previously off-limits.

The brush settings – and more specifically, the pen pressure settings – are arguably the most impactful of these. By activating these, you gain the ability to control the brush pressure simply by varying how hard you press down on the tablet.

For instance, if you have the “Always Use Pressure for Size” option selected, your brush size will vary in accordance with the force you apply with the pen.

If you’re using the opacity option, a light touch will result in a low-opacity brush stroke. Activate both settings, and the effects become compounded.

Mastering the pressure settings is, in my opinion, one of the most powerful advantages of using a graphics tablet for photo editing. In fact, in isolation, these settings provide a compelling case for using a tablet if you’re still unsure. My advice? Get well-acquainted with these settings – they will shape your graphics tablet editing experience.

How to Use a Graphics Tablet to Edit Photos: 10 Powerful Tips
Taking control of the pressure settings is one of the most powerful aspects of using a graphics tablet for photo editing.

6. Try tilting brushes

Don’t be surprised if you find yourself rarely using tilt-sensitive brushes for photo retouching. But, hey, they’re there, so why not get acquainted with them? You don’t want to accidentally stumble onto these tools and suspect a malfunction in your tablet.

A charcoal pencil brush, for instance, reacts based on how you position your pen. All the lines you see below were crafted simply by altering the pen’s hold, all while keeping the pressure settings at zero:

Using a graphics tablet unlocks features in Photoshop that are otherwise unavailable.

In other words, these tilt-sensitive brushes change their shape and texture based on your pen hold, mimicking how an artist varies their brush or pencil strokes. It’s a playful feature to experiment with. If you manage to incorporate it into your photo editing process, well, that’s quite a bonus!

7. Explore digital art tutorials

Using a graphics tablet for retouching can feel both intuitive and bafflingly counterintuitive. If you have some art experience, you’ll likely find it easier to adapt. But if you’re like me – with zero art background – do yourself a favor and spend some time watching digital painting tutorials.

The most beneficial types of tutorials to seek out include:

  • Drawing lines: These exercises are about mastering control over your stylus and familiarizing yourself with your tablet’s pressure sensitivity. They’ll help you make more precise movements, ultimately enhancing the quality of your output. Watching these tutorials and practicing line drawing will boost your confidence and experience with your tablet.
  • Rendering: Digital painting tutorials that focus on painting with values can be highly useful, especially when you want to apply techniques like dodging and burning. These methods will improve your blending skills and encourage more controlled adjustments.
Follow digital painting tutorials to get better at using a graphics tablet.
Following tutorials that teach you how to practice making lines and other marks will help you gain confidence and experience!

8. Practice with your graphics tablet stylus

You’ve watched the tutorials. Great! Now, it’s time to roll up your sleeves and get your hands dirty.

Set up a blank canvas and work on those brush strokes using different pressure settings. This is the key to mastering your tablet quickly.

Similarly, it’s essential that you practice blending values, especially if you plan to incorporate certain retouching techniques into your workflow. Practice relentlessly, both within and beyond the scope of retouching.

Bottom line: Don’t stop at watching the tutorials. Practice fervently, and make it a point to revisit these exercises periodically. Regular practice is your golden ticket to becoming proficient with your tablet.

Practice using a graphics tablet as often as possible.
Don’t just follow the tutorials once. Practice a lot at first, then make it a point to practice some more at regular intervals.

9. Warm up before you start

This one is entirely optional, but if you’re feeling stiff and not getting the results you want, you can borrow another technique from traditional artists and do some warm-up exercises.

You don’t need anything fancy here. Just fire up Photoshop, open a blank canvas, and spend a few minutes – say two or three – honing your line work and rendering, or any other skill you plan to use in your editing session. Simple yet effective!

10. Practice, practice, practice!

How to Use a Graphics Tablet to Edit Photos: 10 Powerful Tips

How do you truly master your graphics tablet? The answer’s as old as time: practice! And then practice some more.

Every skill in life demands repetition and patience, and using a graphics tablet is no different. The more you use it, the better you’ll get. So don’t hold back. Dive in and start racking up those hours. The early hiccups you encounter will soon be a thing of the past.

How to use a graphics tablet for editing: final words

There you go: 10 nuggets of wisdom to guide your journey into the world of photo editing with a graphics tablet. I didn’t share anything too complex, but you’ve hopefully found a tip or two to help you get off to a good start.

So remember the advice I’ve offered, set up that tablet, and have fun. A graphic tablet genuinely can revolutionize your editing workflow; you just have to be open to it!

Now over to you:

Do you have any additional tips or tricks for using a graphics tablet? Share your thoughts in the comments below!

The post How to Use a Graphics Tablet to Edit Photos: 10 Powerful Tips appeared first on Digital Photography School. It was authored by John McIntire.