5 Lightroom Tips and Tricks (to Revolutionize Your Editing)

The post 5 Lightroom Tips and Tricks (to Revolutionize Your Editing) appeared first on Digital Photography School. It was authored by Kunal Malhotra.

tips for better editing in Lightroom

Looking for Lightroom tips and tricks to improve your workflow, increase your speed, and enhance your edits? You’ve come to the right place.

I’ve been using Lightroom for over a decade, and in this article, I share my top advice for amazing results, including:

  • The panel that everyone should use for beautiful, artistic edits
  • An easy way to apply complex edits at high speeds
  • The best tools for creating fine-tuned, professional effects

Let’s do this!

1. Create color harmonies using the HSL panel

If you’ve never worked with the Lightroom HSL panel, then you’re in for a treat. It’s a little option hidden underneath the Tone Curve that looks like this:

Lightroom tips HSL panel

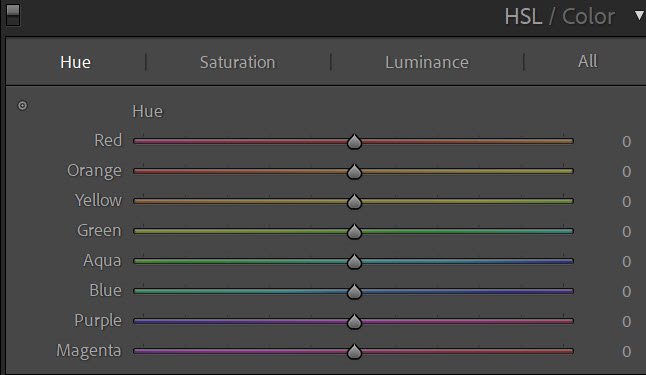
The panel works by targeting different colors independently. You can choose to tweak only the reds in an image; you can brighten only the greens; you can desaturate only the blues. You simply pick the corresponding color slider, then make the necessary adjustments.

Note that the HSL panel lets you adjust colors in three specific ways. You can:

  1. Change color hues. You can make the reds more orange, the purples more pink, or the blues more green.
  2. Change color saturation. You can make the blues more faded or the reds more intense.
  3. Change color luminance. You can brighten up the greens, darken down the blues, or brighten up the yellows.
Lightroom tips HSL panel

When you’re just starting out, I’d recommend simply experimenting with the different sliders until you get an effect that you like, but here are a few ideas to try:

  • Remove all the cool colors from an image for a warm, cinematic look
  • Saturate the color of the main subject while desaturating the colors in the background
  • Push several different colors in the same direction for a simpler color palette (and a more harmonious result)

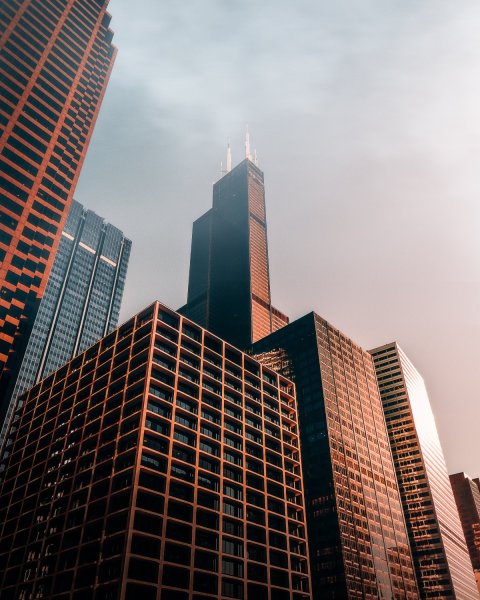
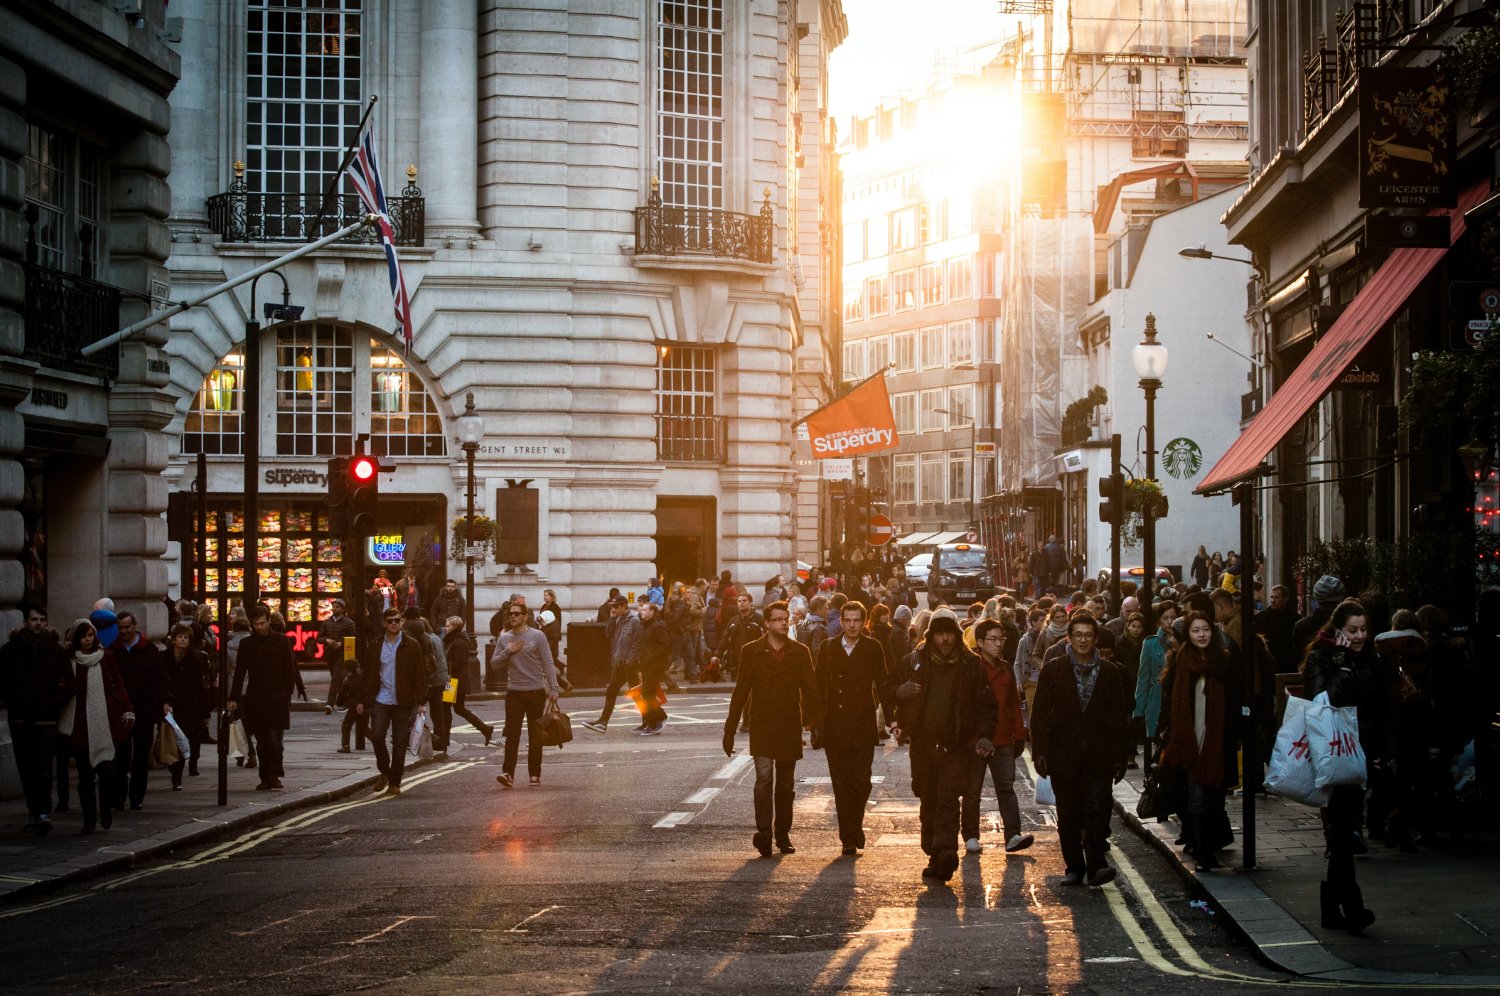
This image, for instance, features a warm color palette (which can be achieved by desaturating blues, greens, and magentas:

people walking at sunset

2. Try the automatic slider adjustments

Sometimes, it can be hard to know how to start (or continue) a Lightroom edit.

In such cases, I recommend a simple little trick:

Hold down the Shift key, then double click on the sliders in the Basic panel. Lightroom will analyze your image, then apply adjustments automatically.

Lightroom Basic sliders

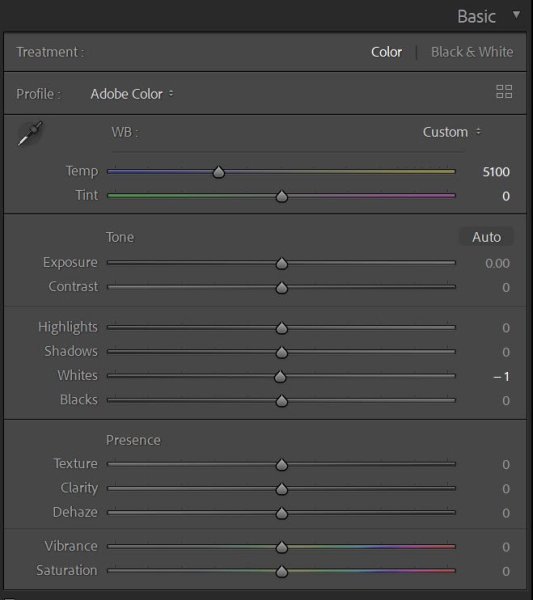
No, the edits won’t always be perfect, but they often look nice – and if you hate the result, you can always double-click on the slider name to set it back to zero. Plus, you can always use the automatic settings as starting points, then edit from there.

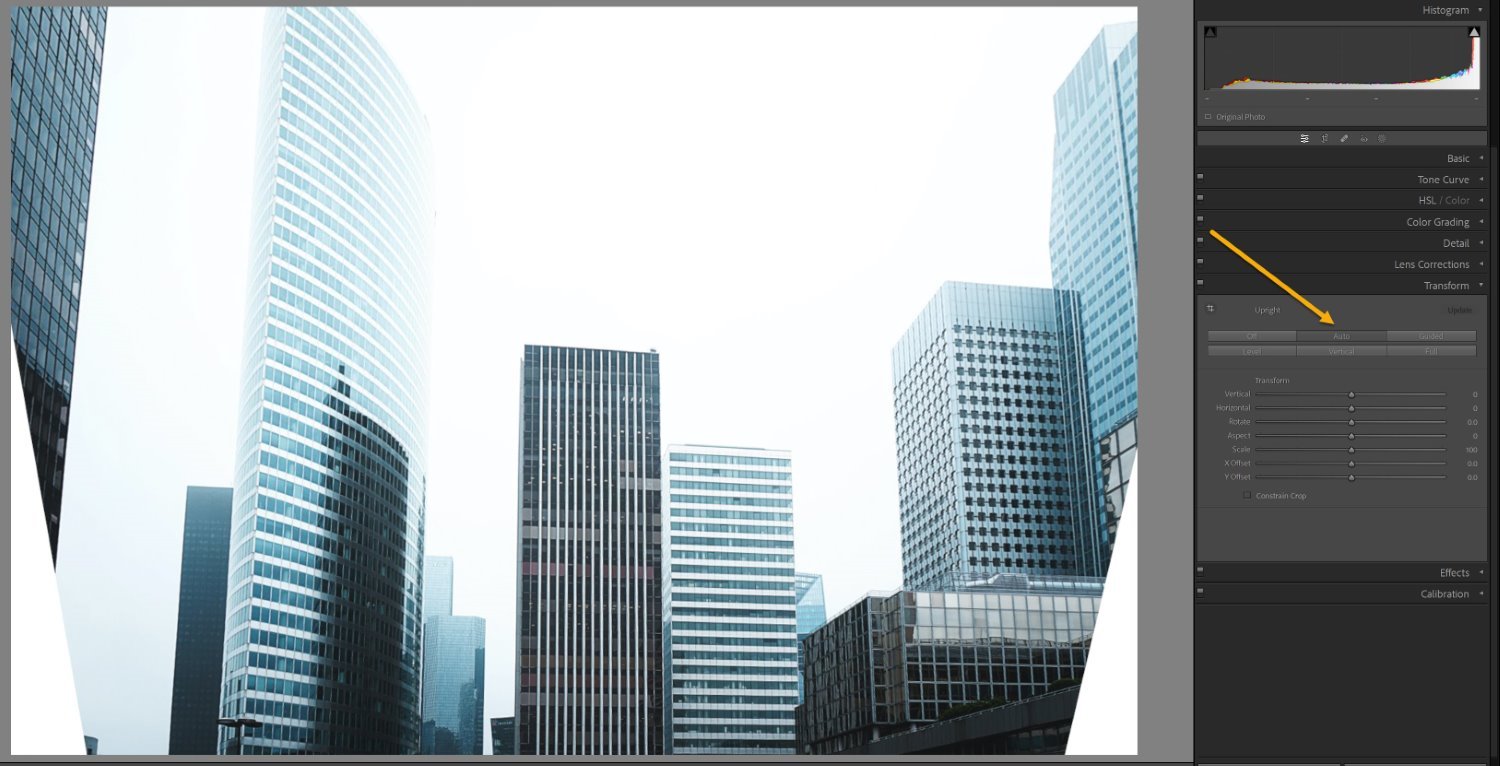
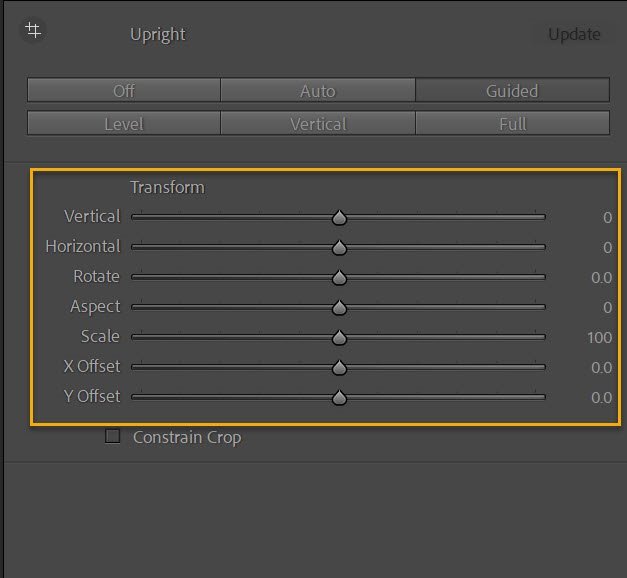
By the way, if you want to see all of Lightroom’s automatic edits at once, just click the Auto button above the Exposure slider:

Lightroom Auto option

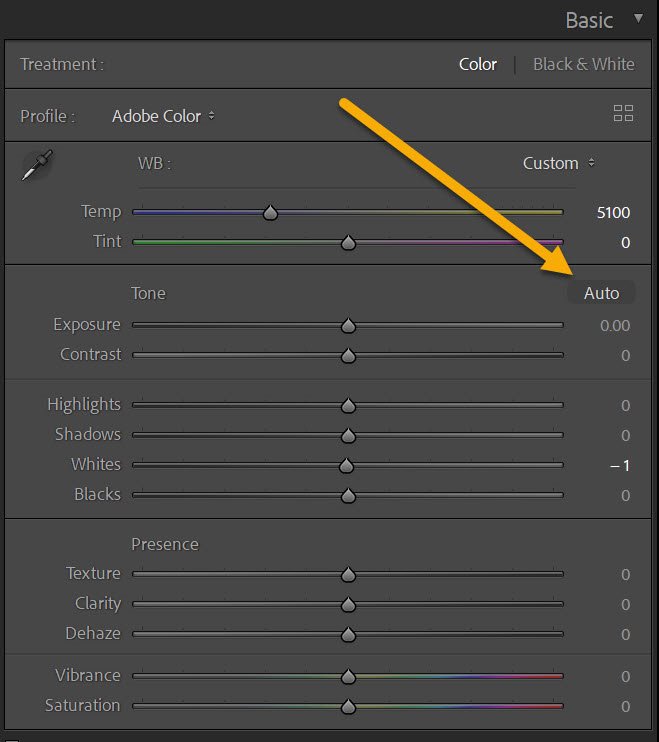
It’ll instantly adjust the sliders in the Basic panel!

Now, these automatic adjustments don’t work for all Lightroom sliders. They won’t work outside the Basic panel, and they won’t work on the Texture, Clarity, and Dehaze sliders.

But you can use it to automatically adjust the white balance, the exposure, the contrast, and even the saturation – so why not give it a try and see what you think?

3. Use the clipping masks (or the clipping warnings)

Clipping refers to a loss of detail in the highlights and/or the shadows of an image – and in general, clipping is pretty bad.

Unfortunately, it can be difficult to tell whether you’re actually clipping details while editing, and it’s possible to exacerbate clipping issues by pushing your sliders too far without realizing it. You can always keep an eye on the histogram, but it can be difficult to interpret, especially for beginners.

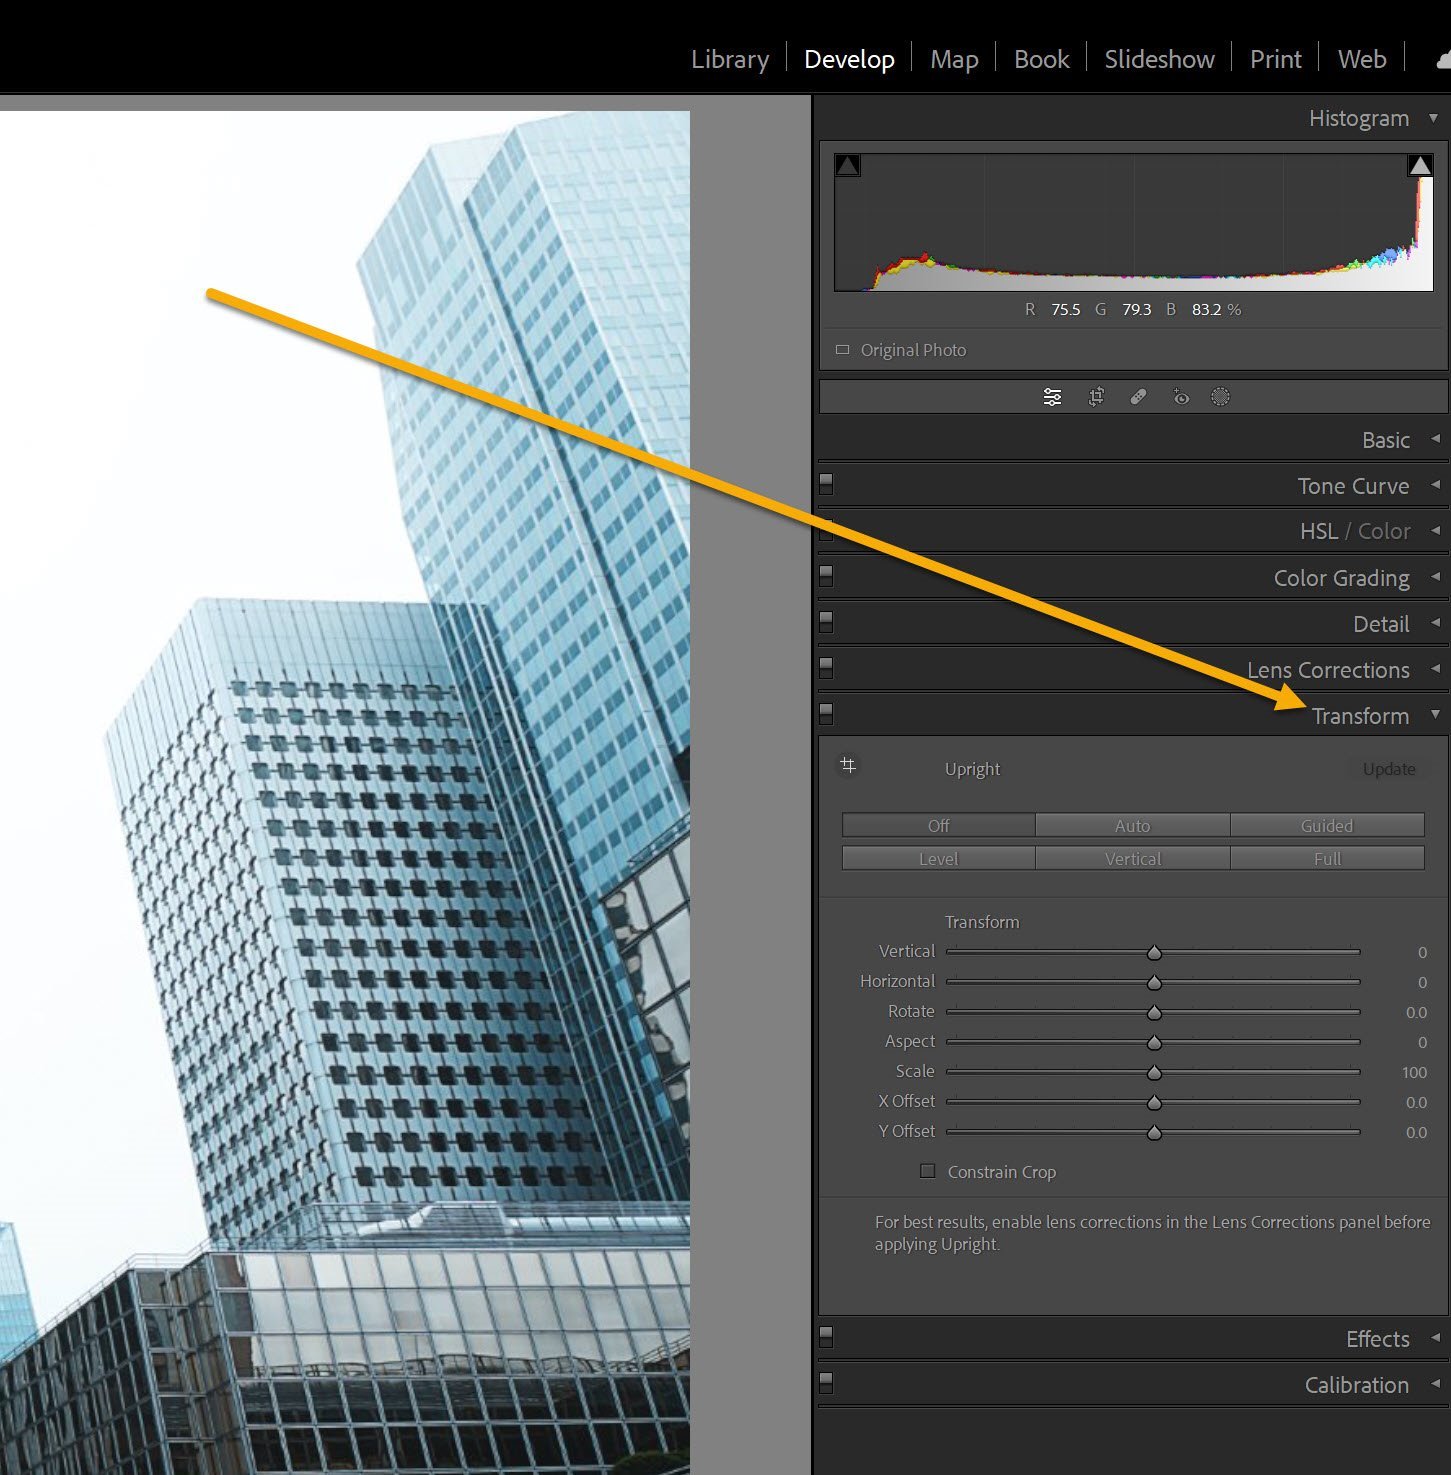
Fortunately, Lightroom has a solution: The clipping masks, which clearly indicate clipping in real-time.

Before you adjust the Exposure, Highlights, Shadows, Whites, or Blacks slider, simply hold down the Alt/Opt key. Then, when you increase or decrease the sliders, you’ll see a white or a black overlay, like this:

Lightroom tips clipping masks

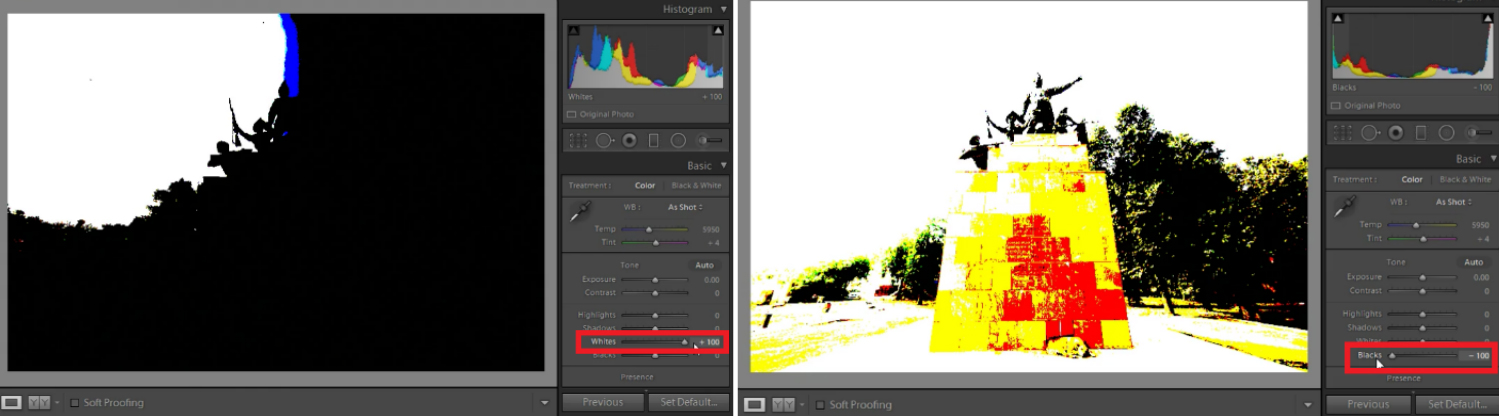
A mask that reveals zero clipping will be all white or all black. But a mask that shows some clipping will change colors over the problem areas:

(Note that, when adjusting the Blacks or the Shadows, clipping is indicated as color on white. On the other hand, when adjusting the Exposure, the Whites, or the Highlights, clipping is indicated as color on black.)

As long as you have no clipping, you’re good to go – but as soon as you start to see a loss of detail, you’ll want to dial back the intensity of your edits. Make sense?

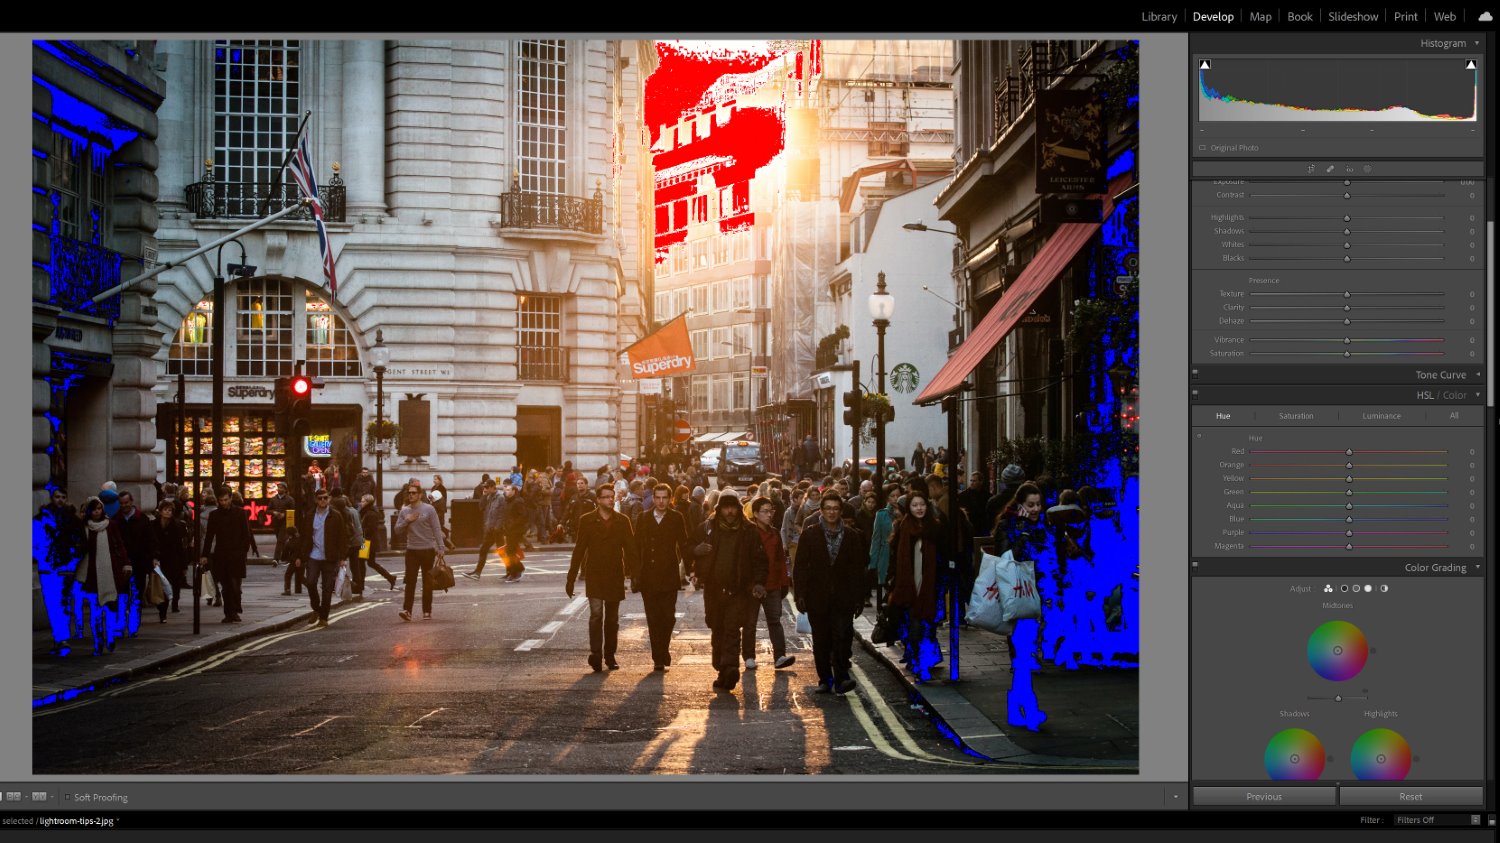
One more quick Lightroom tip: If you want to identify clipping but you don’t want to spend time looking at the masks, you can always click the arrows at the top of the histogram:

Lightroom clipping indicators

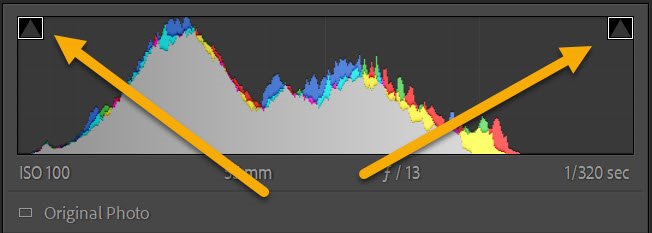
This will activate the clipping indicators, which will cause clipped shadows to turn blue and clipped highlights to turn red:

Lightroom clipping indicators

4. Use the copy-paste shortcut to speed up your workflow

Say you’re editing a large volume of photos from an event, a wedding, or a portrait photoshoot. You need to move through the photos quickly, so you don’t want to edit each file individually.

You could create presets, but each one takes time to produce, and if the presets are photoshoot-specific, you may never use them again.

Instead, why not use Lightroom’s copy-paste option?

You see, after you edit an image, you can always select Edit>Copy (or press Ctrl/Cmd+C). A window will pop up, asking you which settings you want to copy:

Lightroom copy settings

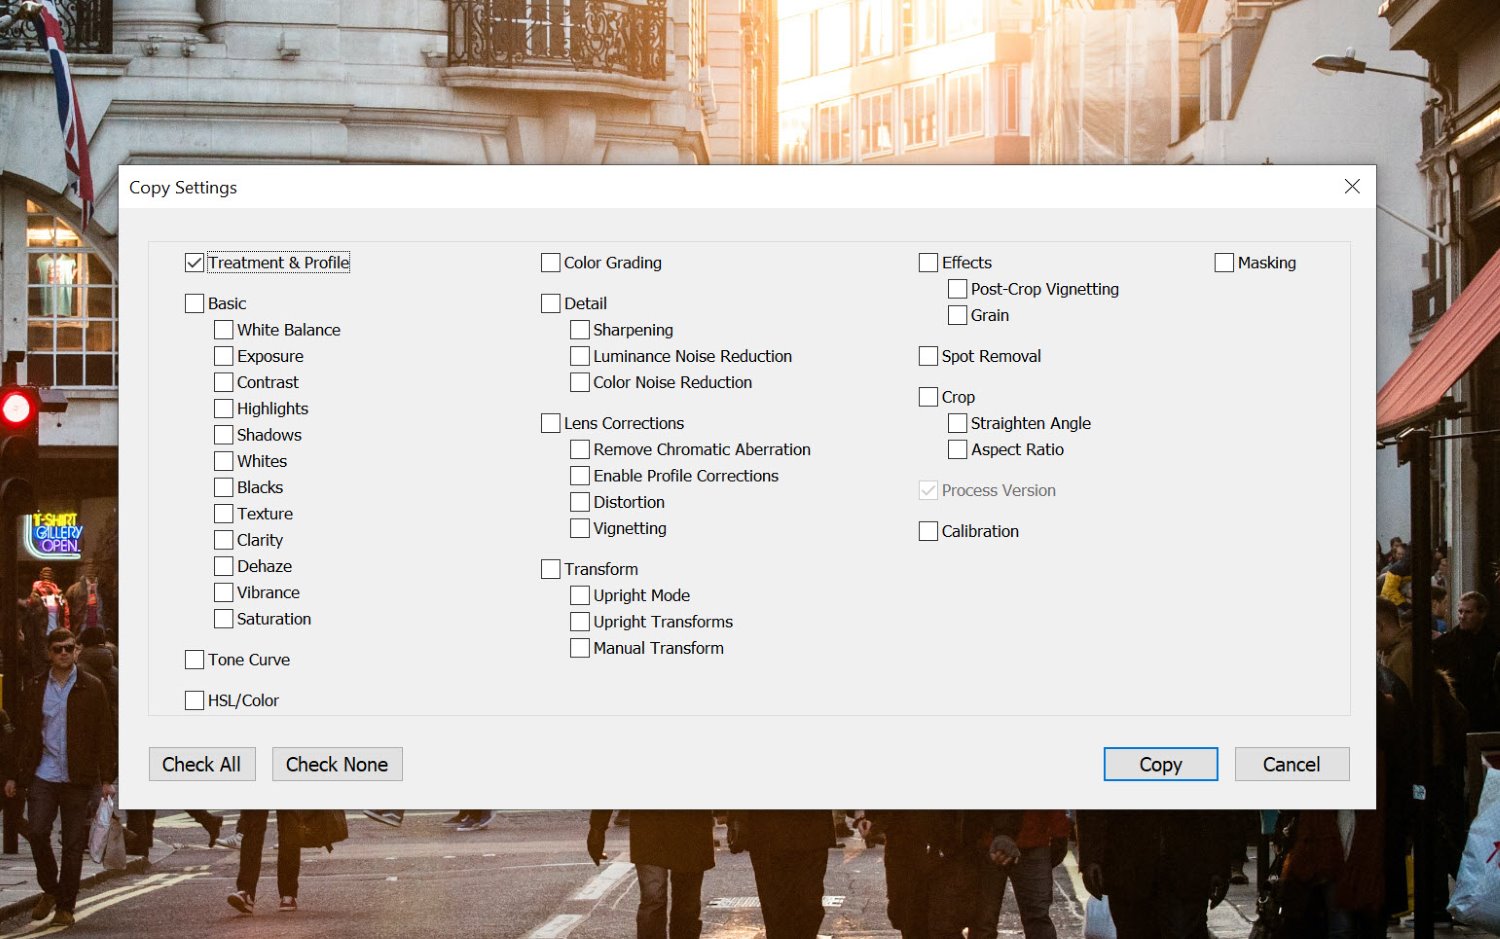
Then, once you’ve chosen the relevant settings, select your to-be-edited photos, then choose Edit>Paste (or press Ctrl/Cmd+V).

The settings from your original photo will be pasted onto the selected images, and your editing work will be done!

This can be a great way to handle complex photoshoots. For instance, if you captured images in multiple types of light, you might edit the first front-lit image, copy the settings, and paste them across all the remaining frontlit images. You could do the same for the backlit images, the shaded images, and so on – and if you require even more control over your results, you can make slight adjustments to your settings as you go, then copy again and paste as required.

I do have one recommendation, though:

Even if you think you’ve done a successful copy-paste job, quickly go through the edited images and make sure everything looks okay. You don’t want to send images to a client, only to realize that you cropped all the files by accident!

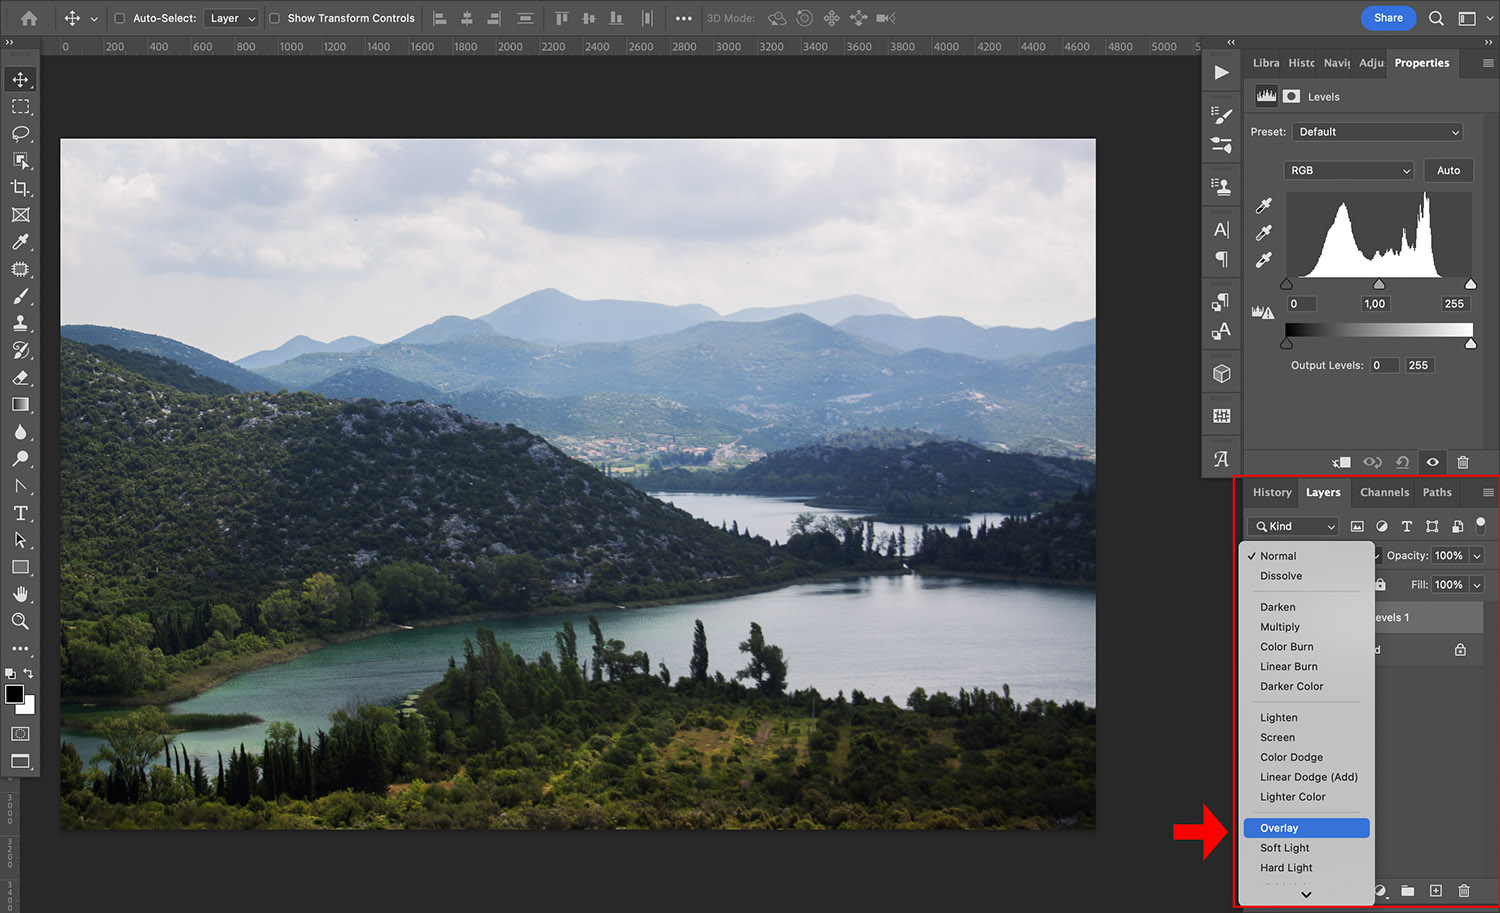
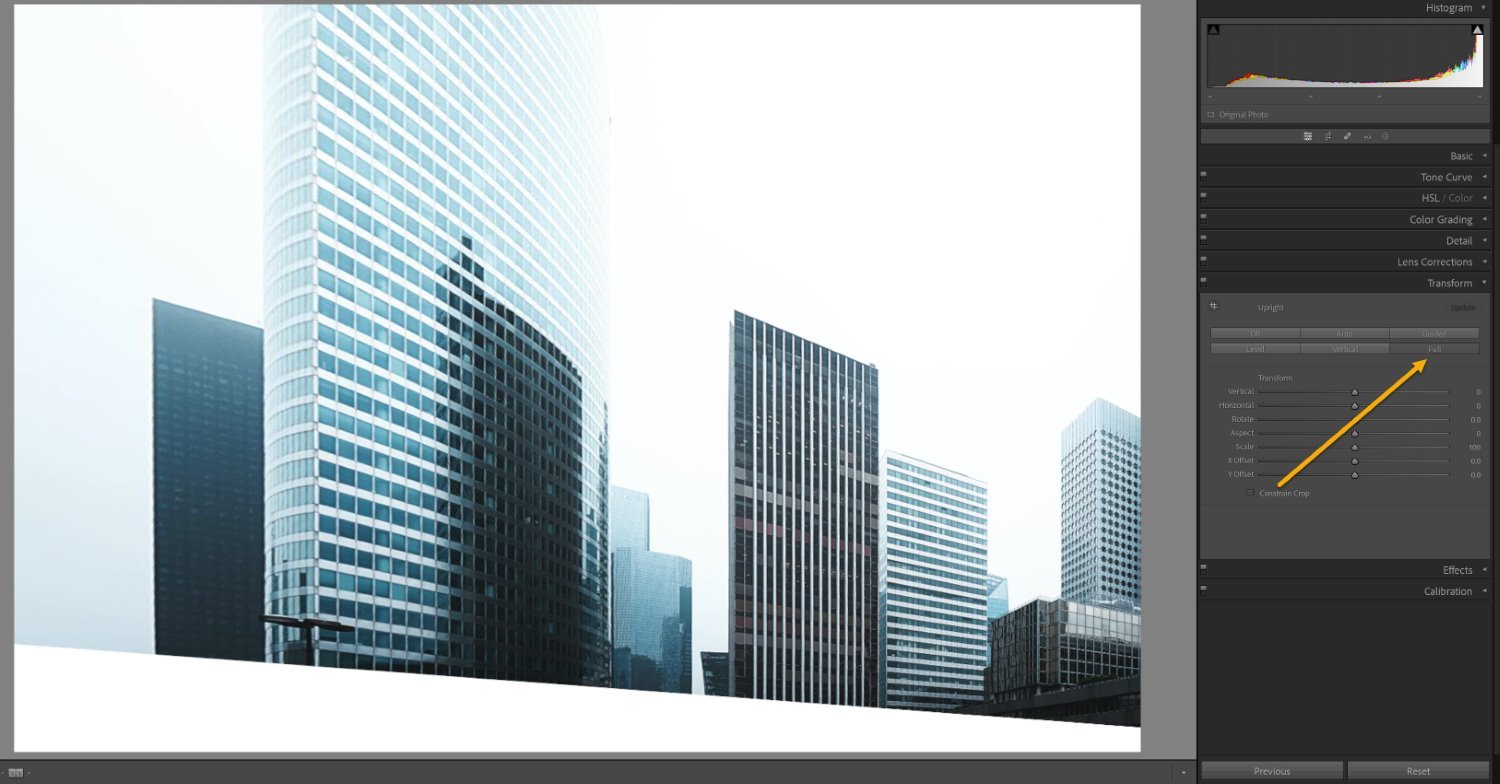
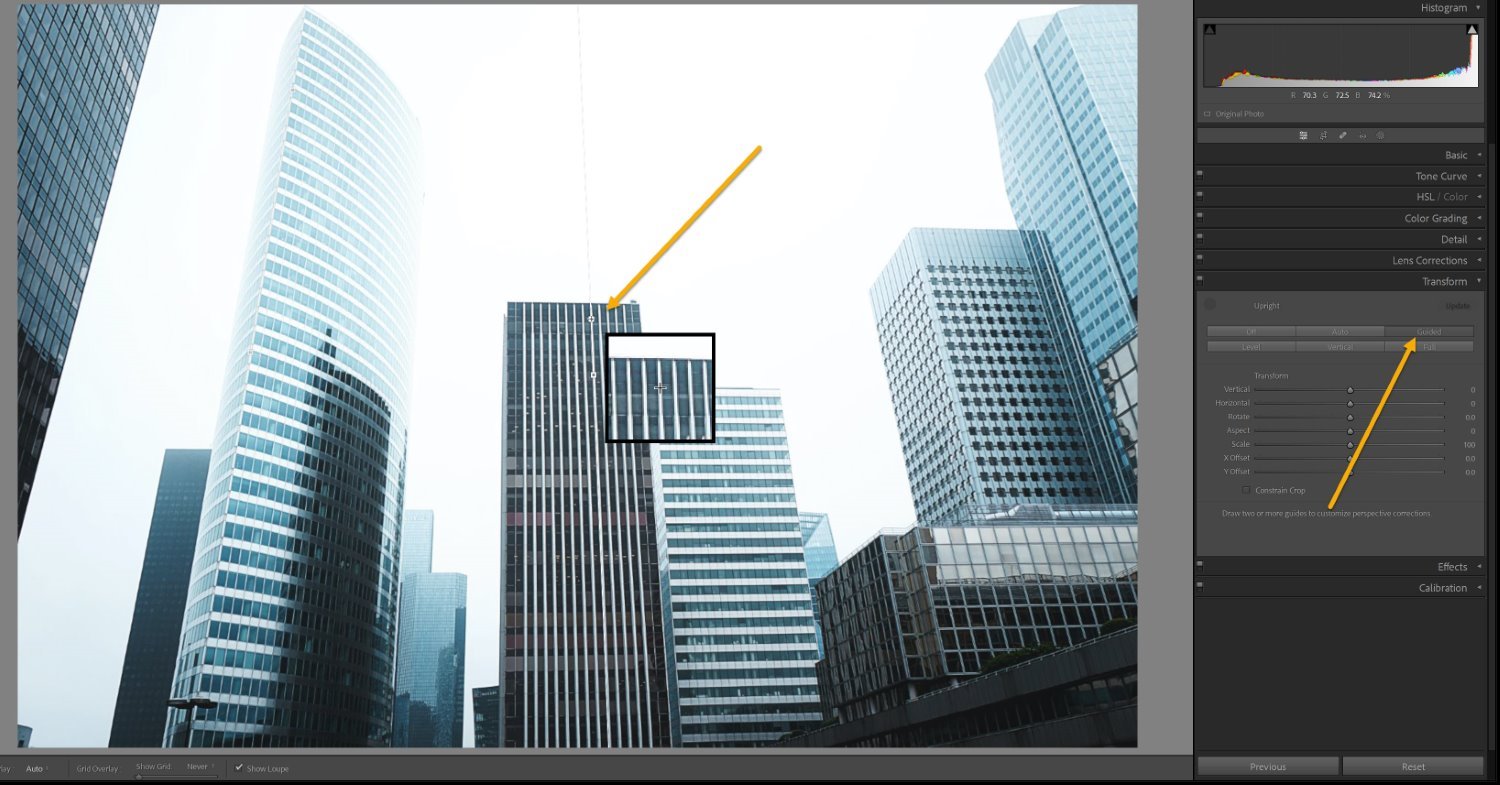
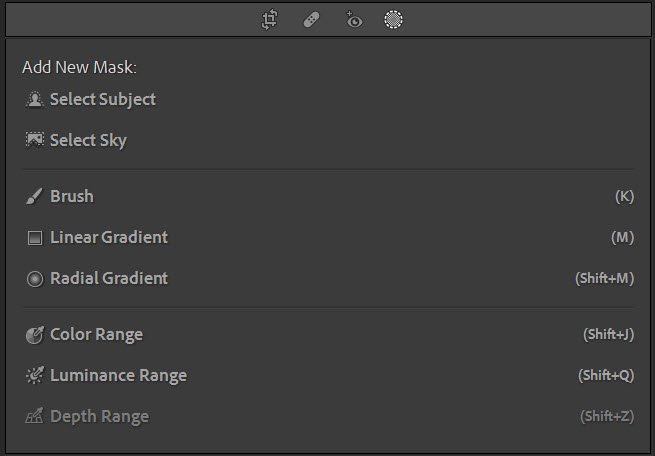
5. Use Lightroom’s local adjustment tools

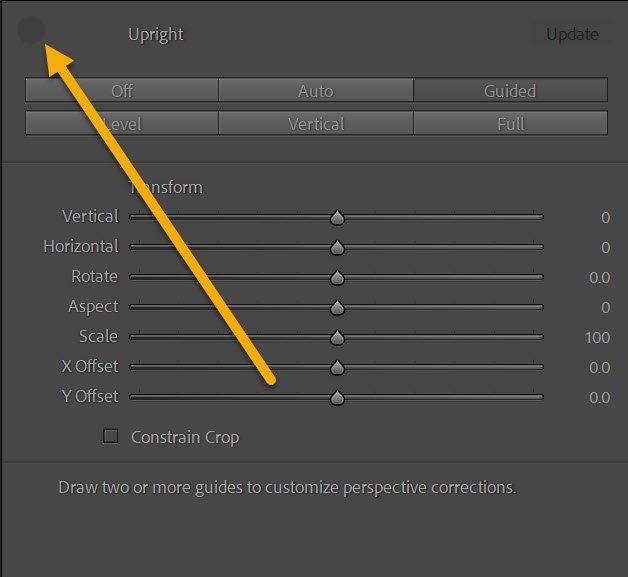
Lightroom offers a handful local adjustment options – referred to as masking tools – and they are insanely powerful. You can find them toward the top of the editing panels, just underneath the histogram:

Local adjustment tools

Unlike global adjustments, which affect the entire image, local adjustments only change a portion of a file.

So while you can brighten up an entire image using the Exposure slider, you can brighten up just the foreground using a local adjustment; while you can sharpen the entire image using Lightroom’s Detail sliders, you can sharpen only the main subject using a local adjustment. They’re a great way to create fine-grained, detailed edits that add depth, enhance color, and push the viewer’s eye toward the main subject.

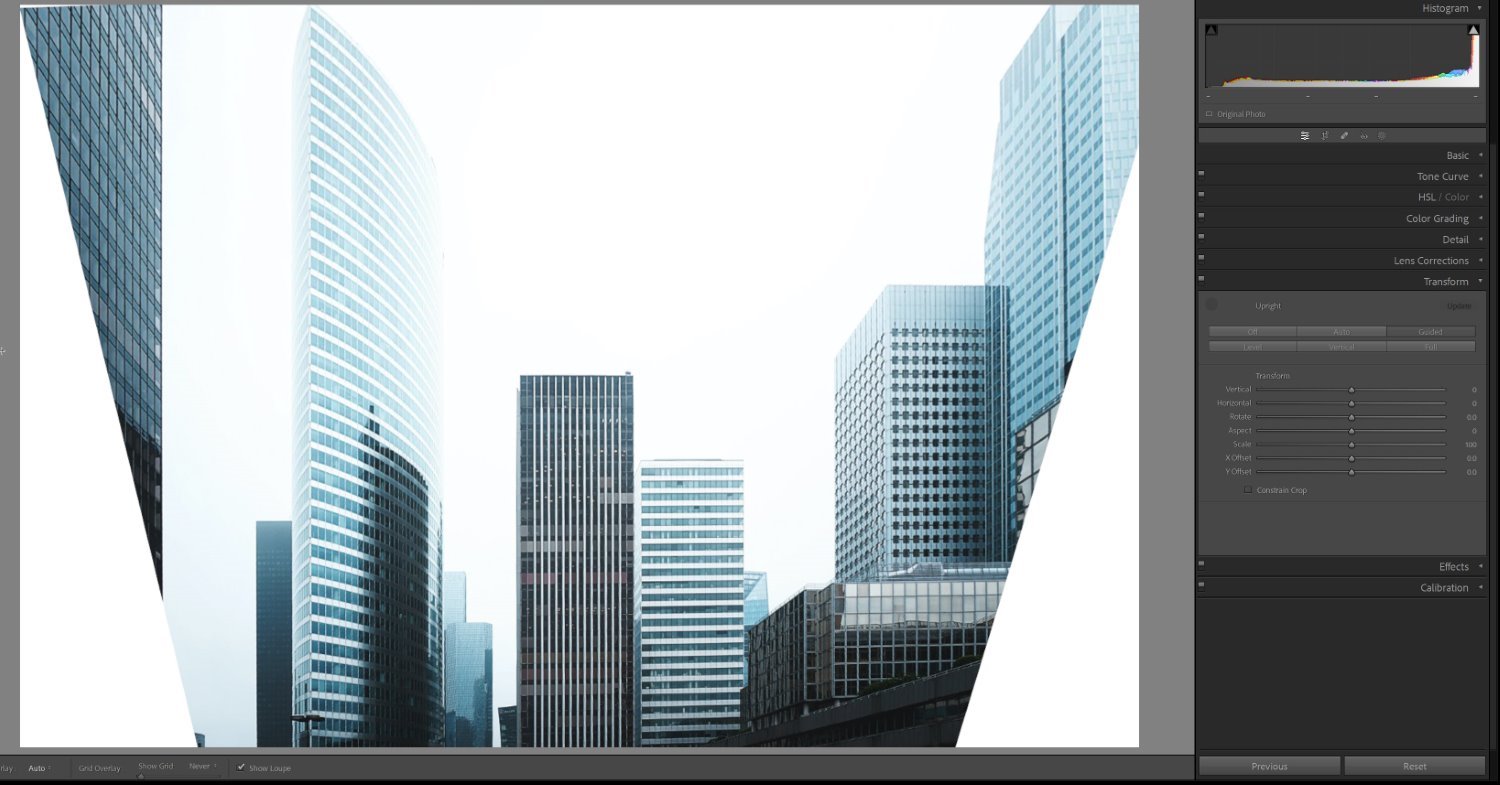
I like to use local adjustments for all sorts of things, but here are a few ideas:

  • Use a Radial Gradient to add a vignette (i.e., a darkening effect) around the edges of the frame
  • Use a Radial Gradient to boost the exposure of the main subject
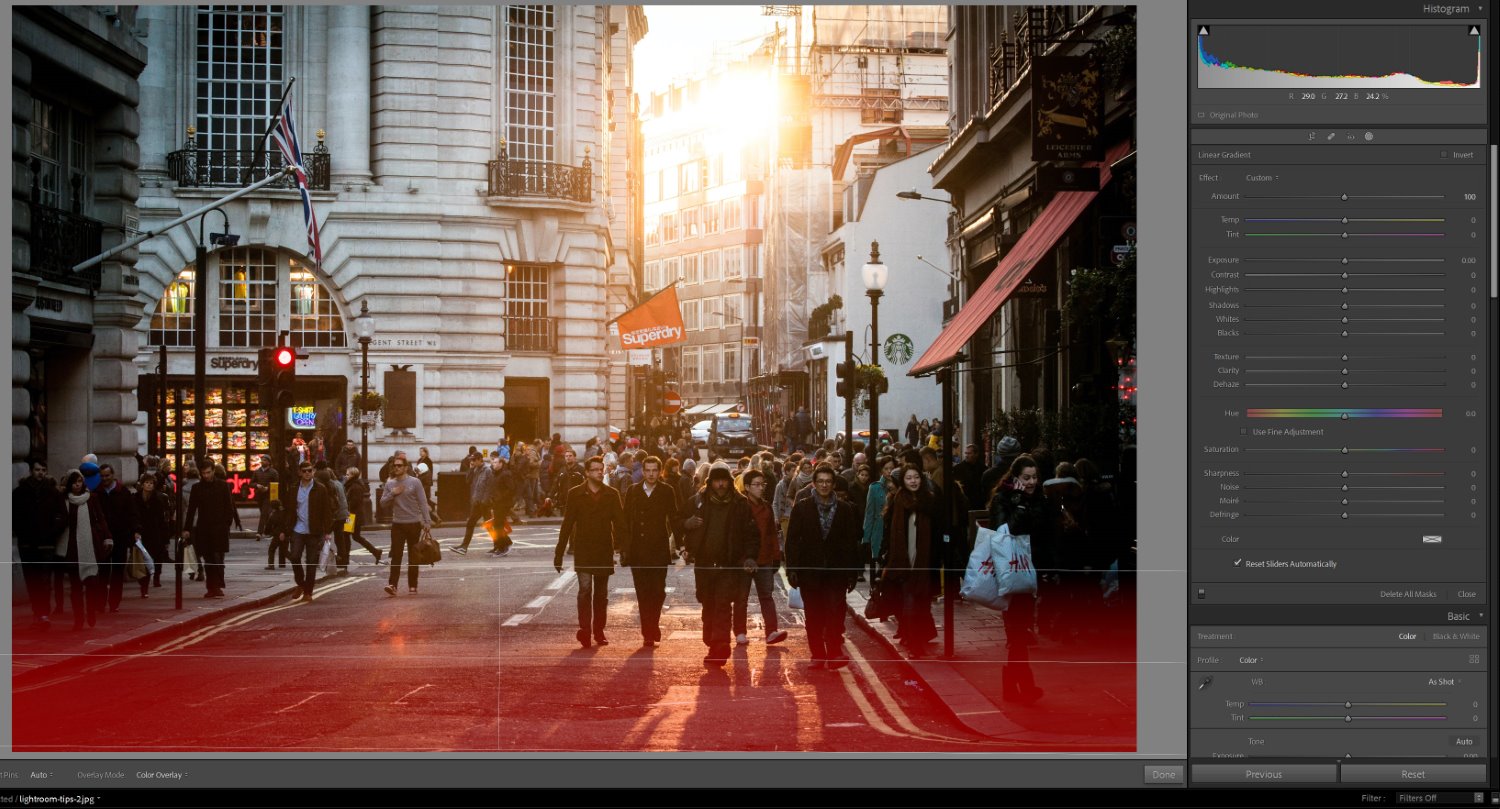
  • Use a Linear Gradient to decrease the exposure and increase the contrast in the sky
  • Use a Linear Gradient to darken the foreground
Linear Gradient on the foreground Lightroom tips
Here, a Linear Gradient is being applied to the image foreground.

Really, when it comes to local adjustments, the sky is the limit. Feel free to use the suggestions I provided above, but also make sure you experiment. That way, you’ll get a deep sense of how the masking tools work and what they can do for your photos!

Lightroom tips and tricks: final words

Well, there you have it:

Five tips to take your Lightroom editing to the next level.

So try out these suggestions. See how you like them. And let us know in the comments how they work out!

The post 5 Lightroom Tips and Tricks (to Revolutionize Your Editing) appeared first on Digital Photography School. It was authored by Kunal Malhotra.

How to Create Grids and Guides in Photoshop

The post How to Create Grids and Guides in Photoshop appeared first on Digital Photography School. It was authored by Ana Mireles.

How to create grids and guides in Photoshop

Did you know that Photoshop has grids and guidelines? If you’re eyeballing your lines every time you’re correcting a building’s perspective, straightening a horizon, or placing a logo on a photo, then Photoshop’s grids and guides can make a huge difference. (And that’s not even taking into account everything you can do with the tools if you create flyers or do any other graphic design work.) 

In this article, I offer a quick overview of Photoshop’s positioning tools. I explain what grids and guides actually are and how to create them, plus I share some tips and tricks for consistently great results.

Let’s dive right in, starting with the basics:

What is a grid in Photoshop?

A grid is a series of horizontal and vertical lines that covers Photoshop’s canvas, like this:

How to create grids and guides in Photoshop

Grids are designed to make it easier for you to locate specific points on the screen. You can use grids to create symmetrical designs and align multiple elements, among other things. It’s worth noting that a grid is just a visual aid inside Photoshop; the gridlines aren’t saved or printed on the image.

What are guides in Photoshop?

Guides are individual lines that you can draw across the Photoshop canvas:

How to create grids and guides in Photoshop

Guides can be used to create designs, straighten elements, control spacing, and much more. They can be horizontal or vertical lines, and like grids, they are only visual aids inside Photoshop; if you save your image without first removing your guides, the lines won’t appear in the final file.

How to create a grid in Photoshop

Creating a grid is easy. Simply head into the Photoshop menu, then select View>Show>Grid. Take a look at your image, and you should see a series of lines crisscrossing the page.

(Note: Once you’ve enabled grids, if you select View>Show, you’ll see a checkmark next to the Grid option. If you’re ever unsure about whether grids are enabled, simply go to View>Show and look for that checkmark!)

How to create grids and guides in Photoshop

Photoshop’s grid has clear horizontal lines, which look like the graphing paper kids use in math class. By default, gray gridlines will appear every two centimeters with four subdivisions:

How to create grids and guides in Photoshop

However, these settings can be modified. In fact, you can create as many or as few gridlines as you want! Simply go to Photoshop>Preferences>Guides, Grid & Slices. Once there, you can change the color of the gridlines, the type of gridlines, the separation between gridlines, and the number of subdivisions. 

A grid can act as a visual aid that helps you manually place elements on the canvas – but it’s also a great way to align existing elements by snapping them together. You see, Photoshop grids offer a snap feature. Simply select View>Snap to>Grid. Then whenever you move an element across the canvas, it’ll align with the closest gridline!

How to create grids and guides in Photoshop

It’s important to remember: The grid won’t print. It’s a visual aid only, so you don’t need to worry about disabling it at the end of your project. (But it can be helpful to look at your final piece without a grid; that way, you can accurately analyze the end result.)

To disable the grid, simply choose View>Show>Grid. Your existing grid will disappear, and if you head back to the menu, the Grid option will be unchecked.

How to create a guide in Photoshop

As I explained above, guides are lines that you manually add to the Photoshop canvas. You can choose to cover the whole canvas with guides, but you can also create a single guide. In other words, you can create guides on an as-needed basis.

(Of course, you can always create both a grid and a few guides. In fact, you can use a grid to better position your guides! Also, note that guides, like grids, won’t be printed.)

How to create grids and guides in Photoshop

To create a guide, you need to first have the rulers enabled, so go ahead and select View>Rulers. (You can also use the keyboard shortcut Ctrl/Cmd+R).

Once you’ve done this, you should see one ruler on the left and one on top of the canvas. To create a horizontal guide, click and drag from the top ruler; to create a vertical guide, click and drag from the left ruler.

How to create grids and guides in Photoshop

Drag your guide into position, then let go of the mouse. The guide will remain in place, and you can continue on with your work (or you can choose to create additional guides). If you misplace the guide or wish to move it later on, activate the Move tool from the toolbar. Then hover over the guide until you see the cursor change into a double line with arrows. Click and drag to move the guide to a new position.

How to create grids and guides in Photoshop

It’s also possible to create a new guide that appears directly on the Photoshop canvas. Select View>Guide>New Guide, which will open a pop-up dialog box. In it, you can set the line’s orientation, position, and color.

You can even use guides to create a custom grid. Head to View>Guide>New Guide Layout. A pop-up dialog box will appear, where you can indicate the number of columns and rows you want to create. You can also set the size, gutter, and margin. And the best thing about this option is that you can save each new layout as a preset and load it in future documents.

How to create grids and guides in Photoshop

Note: Since you can move guides with the Move tool – which you can use to move other objects – they can be moved by accident. To prevent this, make sure you lock your guides in place. Just create all the guides you need, then select View>Guides>Lock Guides.

The guides also have a snapping feature, which you can use to accurately position elements on the canvas. Enable it by selecting View>Snap to>Guides.

How to create grids and guides in Photoshop

If you wish to erase a guide, just drag it back to the ruler. Alternatively, you can click on the guide, then choose View>Guide>Clear Selected Guide. And if you want to delete every guide, click View>Clear Guides.

How to create grids and guides in Photoshop

Creating grids and guides in Photoshop: final words

Photoshop may not be a dedicated graphic design program, but it does have many design-focused tools to improve your workflow – including, of course, grids and guides!

Plus, grids and guides aren’t just useful for graphic design; you can also use them to help you scale images, make photo composites, correct perspective, and more.

So practice creating a grid. Have fun with guides. And see what you can produce!

Now over to you:

How do you plan to use grids and guides in your photo-editing and/or design work? Share your thoughts in the comments below!

The post How to Create Grids and Guides in Photoshop appeared first on Digital Photography School. It was authored by Ana Mireles.

Overlay Blend Mode: A Comprehensive Guide

The post Overlay Blend Mode: A Comprehensive Guide appeared first on Digital Photography School. It was authored by Ana Mireles.

A guide to Photoshop's Overlay blend mode

Looking to understand the ins and outs of Photoshop’s Overlay blend mode? You’ve come to the right place.

Overlay is a great way to add punch to otherwise flat images, plus it can be used to apply artistic effects such as color tints. It’s a very versatile blend mode, and it’s pretty popular, too – so it pays to understand what it is, how it works, and when you might want to use it in your photo editing.

Below, we offer a thorough guide to this powerful tool. Let’s get started!

What is Overlay blend mode?

Photoshop – and other layer-based editing programs – offer over two dozen blending modes, which determine how different layers interact. The Overlay blend mode belongs to the “Contrast” section of the blending mode menu, which means that it’ll increase the intensity of the blended layers.

Overlay is actually a mix of two other common blend modes: Screen and Multiply. When Overlay is applied to a layer, Photoshop uses the Screen blending mode to handle any tone that’s brighter than 50% gray. And Photoshop uses the Multiply blending mode to handle any tone that’s darker than 50% gray.

So unlike other Contrast blending modes, it takes effect according to the brightness level of the base layer. In other words, it doesn’t apply some distinct operation to the base color of the layer; instead, it Screens or Multiplies.

That said, if the technical underpinnings of Overlay blend mode are making your head spin, don’t worry. The Overlay effect is easy to understand on a visual level: It makes dark tones darker and bright tones brighter. Look at what happens when I take a normal array of gray tones (below the red line), duplicate the image, and apply the Overlay blend mode (above the red line):

Overlay blend mode Photoshop

The lightest tones (on the left) got even lighter. And the darkest tones (on the right) got even darker.

When should you use Overlay blend mode?

Overlay blend mode Photoshop

As I mentioned above, the Overlay blend mode is a mix of two other blending modes – Screen and Multiply – so it’s very versatile. You can use it in all sorts of scenarios, though here are a few of the most common:

How to use the Overlay blend mode

Using Overlay isn’t especially difficult. Start by opening an image in Photoshop, then add a second layer.

(Why is this necessary? Remember that blending modes tell Photoshop how layers should interact. Changing the blending mode of a single layer doesn’t have any effect; instead, to see a difference in your image, you need a second layer that can interact with the first.)

The type of layer you add doesn’t really matter. It can be a Smart Object, another picture, a solid color, an adjustment layer, etc.

Next, go to the Layers panel, which should be on the right-hand side of the screen. If you can’t see it, select Window>Layers or press F7.

Select the top layer in the layer stack. Then open the blending modes menu by clicking the down arrow next to the current blending mode:

Overlay blend mode Photoshop

Navigate to the Overlay blend mode. In Photoshop CC, you can see the blend mode’s effect on your image just by hovering over it. In Photoshop CS6, however, you won’t be able to see the effect until you’ve applied it to your image.

That’s it! If you want, you can adjust the layer’s opacity using the slider next to the blend mode menu.

Overlay blend mode: A step-by-step example

As I mentioned, one of the most common reasons photographers and retouchers use the Overlay blending mode is to add contrast. So that’s what I’ll show you in this example.

My sample photo is a bit underexposed and lacks contrast:

Overlay blend mode Photoshop

So I’ll click on the Create new fill or adjustment layer button and select Levels. (Alternatively, I could select Layer>New Adjustment Layer>Levels in the menu.)

Overlay blend mode Photoshop

Without ever touching my Levels adjustment, I can simply change the blending mode to Overlay and watch as the contrast is increased:

Overlay blend mode Photoshop

But if I want to modify the effect, I can use the Levels sliders to adjust the highlights, midtones, and shadows:

Overlay blend mode Photoshop

If I like the look but feel it’s too strong, I can always decrease the opacity of the Levels layer:

Overlay blend mode Photoshop

Note: Once you’re done adding contrast via the Levels panel, you can always add more adjustment layers (Curves, Color Balance, Hue/Saturation, etc.) to fine-tune your image, or you can save it as it is.

Overlay blend mode tips

Enjoying the power of Overlay blend mode? Here are a few extra tips so you can really explore its potential!

1. Try adding a tint to your photo

If you’re looking to add a tint, a texture, or some other type of final color grade, Overlay can be very useful.

For this next image, I wanted to add a blue tone to mimic cyanotype printing:

Overlay blend mode Photoshop

All I did was convert the photo to black and white. Then I added a Solid Color adjustment layer, chose a nice blue color, and changed the blending mode to Overlay. That’s how I got the effect shown above!

2. Don’t forget about the Hard Light blend mode

Photoshop has several commuted blending mode pairs. With a commuted blending mode pair, you get the same result when applying one blend mode to the top layer as when applying the other blend mode to the bottom layer (and reversing the layer order).

Overlay and Hard Light are commuted blending mode pairs, so if you apply the Overlay blend mode to the top layer, your image will look exactly the same as if you applied the Hard Light mode to the underlying layer before switching the layer order. (Just a useful little tidbit to keep in mind!)

3. Add a cool glowing effect

Overlay blend mode Photoshop

Here’s a fun technique: You can use the Overlay blending mode to add a glowing effect – sometimes called an Orton Effect – to any photo.

Start by duplicating your original layer. You can do this by dragging the layer over the Plus sign at the bottom of the Layers panel.

Then convert your duplicate layer to a Smart Object. (Simply right-click on the layer and choose Convert to Smart Object from the menu. Alternatively, go to Filter>Convert for Smart Filters.)

Technically, the Smart Object conversion step is optional, but it will allow you to go back and adjust your glow effect later on, which can come in handy.

Now select Filter>Blur>Gaussian Blur in the menu, which will open a dialog box where you can set the intensity of the blur (this will directly affect the intensity of the glow effect). Note that there’s no correct blur amount; it depends on the photo and your taste, so you’ll have to use the trial-and-error method.

Once you get a result you like, simply change the blending mode to Overlay, adjust the opacity as needed, and check out your image’s beautiful glow!

Overlay blend mode: final words

I hope you found this guide to the Overlay blend mode useful. As you should now be aware, it’s a helpful blend mode that can be applied in plenty of different situations.

And if you’re not sure whether Overlay might work for a certain scenario, just try it! There’s no harm in experimenting.

How do you plan to use Overlay when editing photos? Do you have any tips? Share your thoughts in the comments below!

The post Overlay Blend Mode: A Comprehensive Guide appeared first on Digital Photography School. It was authored by Ana Mireles.

The Lightroom Transform Panel: A Comprehensive Guide

The post The Lightroom Transform Panel: A Comprehensive Guide appeared first on Digital Photography School. It was authored by Erin Fitzgibbon.

A guide to the Lightroom Transform panel

While Lightroom’s Transform tools often go unnoticed by casual editors, they offer an incredibly powerful solution to a problem that has plagued many a photographer: perspective distortion. In fact, perspective distortion is one of those subtle issues that can significantly harm an otherwise-great photo, yet most shooters don’t know how to recognize its signs or (more importantly!) correct it.

In this article, I offer a comprehensive guide to the Transform panel. I cover all the key elements:

  • What Transform actually is (and what it does)
  • When the Transform tools are useful
  • How each and every button and slider works
  • How you can handle perspective distortion with a few quick adjustments

Ready to take your Lightroom skills to the next level? Then let’s dive right in, starting with the basics:

What is the Lightroom Transform panel?

The Transform panel is buried near the bottom of Lightroom’s array of Develop module tools and sliders, and it’s designed to correct perspective distortion in your photos.

The Lightroom Transform panel

But what is perspective distortion? In practical terms, it’s when lines – either horizontal or vertical – that are supposed to look straight start to converge. You’ll often see perspective distortion in photos of buildings; the sides of the building, instead of climbing straight up into the air, converge toward one another, giving viewers the sense that the building is falling backward.

The Lightroom Transform panel
See how the buildings seem to be falling away from the viewer? That’s because this image features perspective distortion!

Perspective distortion is often unavoidable no matter the quality of your equipment. It’s caused by your position relative to the subject, and while you can technically prevent distortion by keeping your camera perfectly level and parallel to your subject, this is often impractical.

(Note that perspective distortion is different from lens distortion, which is caused by lens optics and can be removed in the Lightroom Lens Corrections panel.)

Fortunately, the Transform panel offers two broad methods for handling perspective distortion:

  • Upright corrections (via six easy-to-use buttons)
  • Transform corrections (via seven handy sliders)

In general, the Upright options do a great job – but if these buttons don’t give you what you’re after, you can always apply additional manual corrections using the Transform sliders.

When should you use the Transform panel?

As the Transform panel is designed to combat perspective distortion, it’s generally a good idea to use it whenever you’ve captured an image with obvious vertical or horizontal lines. Perspective distortion is one of those elements that is rarely noticed until it’s pointed out, so even if your image seems fine, I’d still recommend trying a few Transform buttons to be safe.

The Lightroom Transform panel
This image contains subtle perspective distortion. Can you spot it?

In particular, Transform is useful when editing photos of:

  • Building exteriors
  • Building interiors
  • Trees
  • Telephone poles and lampposts

When you apply the Transform tools to images, the goal is often to create a natural result – that is, a photo that matches how our eyes and brains would perceive the scene in three dimensions. But bear in mind that you can use Transform to do the opposite: exaggerate certain elements for an unnatural, even a surreal, effect.

You can also choose to leave a photo with all its distortion intact, and while I generally don’t recommend this, it can certainly look dramatic!

The Lightroom Transform panel
This image displays heavy perspective distortion – just look at how the buildings’ lines converge – but in this case, it adds a dramatic effect. (Also, correcting this level of perspective distortion would be essentially impossible.)

How to use the Transform panel: The Upright options

When you’re tackling a new image, start by testing out several of the Transform panel’s Upright buttons for handling perspective distortion.

Quick aside: To better illustrate the effects of each option, I’ll use this image, which is plagued by moderate perspective distortion:

The Lightroom Transform panel

By default, the Off button will be selected, so go ahead and click on Auto instead:

The Lightroom Transform panel

Auto attempts to analyze the entire scene and make corrections that take into account perspective distortion along both the vertical and horizontal axes (while also adding in a few other calculations for natural-looking results). As soon as you click on the Auto button, watch your image, paying careful attention to any vertical or horizontal lines.

Note that these distortion corrections will always crop – or force you to crop – into your image when making the adjustment. In most cases, this shouldn’t be an issue, but if you’re photographing a scene and the edge elements are important, I encourage you to leave a bit of extra space along the edges so you can make successful perspective distortions later on.

In my experience, Auto does a good job about 70% of the time. If you don’t like the result (or you want to try out alternatives), press the Vertical button, which is designed to correct only for converging vertical lines. This can sometimes be a good way to handle subtle distortion of buildings while losing less of the scene to cropping.

The Lightroom Transform panel

Another option is the Level button, which corrects only for converging horizontal lines. I don’t use this tool very often, but it can come in handy if you’re shooting, say, storefronts from an angle.

The Lightroom Transform panel
This image primarily contains converging vertical lines, so the Level button did very little.

Note that issues with the Level option may arise when you are working with vertical lines and diagonal lines. This combination of lines can fool the software, and Lightroom may choose to adjust the diagonal lines and skew the rest of the image. In such cases, you’ll need to use a different Upright correction or even rely on the Transform sliders discussed below.

You should also see Full; it applies corrections for vertical and horizontal lines, so it’s also worth trying out. Personally, I’m not a huge fan of the Full option because it tends to overcompensate and create unnatural-looking effects. That doesn’t mean it won’t work for you, but be aware that it’s very aggressive.

The Lightroom Transform panel
The Full option dramatically adjusted and cropped the image.

Finally, you can use the Guided option. Guided combines manual inputs and automatic adjustments for a highly customized effect, so if you’re struggling to get a natural result, this can be a great tool to try.

In fact, while the Guided option does take an extra minute or two to get right, it’s probably the best way to ensure a good result. The problem with the other automatic options is that Lightroom has to determine the vertical and horizontal lines it uses to adjust perspective – and in reality, these may not be the best lines to use! That’s where the Guided tool shines; as the photographer, you know which lines need straightening, and you can direct Lightroom accordingly. Here’s how it works:

When you select the Guided button, your cursor will turn into crosshairs, and you’ll be able to draw lines (i.e., guides) on your image. Start by drawing your guides across two converging verticals.

The Lightroom Transform panel

The image will immediately adjust, but you can then add a third and even a fourth guide across horizontal lines in your image. (You cannot add a third vertical guide; if you do, the Transform panel will give you an “Invalid guide configuration” warning.)

Once you’re done drawing guides, go ahead and click on the circular guide icon above the buttons, and you’re done!

The Lightroom Transform panel

One final piece of advice: After you’ve applied distortion correction, check the edges of your image to ensure there is no white space. Sometimes, the Transform panel will crop this excess space for you, but other times, you’ll need to remove the space yourself. (If you would like Lightroom to always crop away excess space, you can check the Constrain Crop button at the bottom of the panel. But I’m not a huge fan of its approach, so I recommend cropping manually instead.)

The Lightroom Transform panel
The image after applying correction via the Guided option.

How to use the Transform panel: The Transform sliders

The Upright tools discussed above should get rid of perspective distortion quickly and effectively. But if you prefer to make adjustments manually, or if you don’t like the results given by the Upright tools and you want to make modifications, the Transform sliders are a great alternative.

The Lightroom Transform panel

The Vertical and Horizontal sliders are the most useful; they allow you to correct distortion along the vertical and horizontal axes, respectively. Therefore, if you’re dealing with converging verticals, simply adjust the Vertical slider in either direction until the lines appear parallel. And if you’re dealing with converging horizontals, tweak the Horizontal slider instead.

The Rotate slider allows you to rotate the image and can be a precise way to ensure your image is straight.

Then there’s the Aspect slider, which is a good way to handle unwanted compression or expansion in your photos after you’ve applied a different distortion correction.

Finally, you’ll see the Scale, X Offset, and Y Offset sliders, which I essentially never use (they basically crop your images in specific ways). Feel free to test them out, but don’t be surprised if you rarely use them moving forward.

Used on their own, you may find that the sliders don’t actually achieve much. However, when used in combination and in subtle amounts, you can effectively adjust the sliders to obtain the perspective you see in your mind’s eye.

Lightroom Transform panel: final words

Well, there you have it:

Everything you need to know to successfully correct perspective distortion using the Transform panel.

Hopefully, you can now confidently transform your photos in Lightroom, but I’d encourage you to pick a few images with perspective issues, then see if you can make corrections. If you struggle at first, don’t give up; pretty soon, you’ll be able to handle distortion like a pro.

Now over to you:

How do you plan to use the Transform panel? Do you have any tips or tricks for improving your results? Share your thoughts in the comments below!

The post The Lightroom Transform Panel: A Comprehensive Guide appeared first on Digital Photography School. It was authored by Erin Fitzgibbon.